He and his fam are coming for Christmas in 9 days!!! So much to do and I can barely remember how to child-proof a house for a 14 month old. He's in constant motion---we'll just have to shadow him every minute and sleep when he does. At least this old lady will have to nap.
Speaking of trouble, if you were wondering where the wild thing is, tis here. (Funny gift hat from someone. Maybe he'll need it in this Minnesota weather.) But isn't he a good candidate for cutest baby of the year?
Actually, I have been knitting a little. I'll take some photos and put up pretty soon.
Merry Christmas preparations to you!
machine knitting midgauge standard bulky machknit knit machine-knit patterns
Saturday, December 15, 2012
Sunday, November 25, 2012
Charity Hat Flower Technique- Free for Machine Knitters
I can't even believe how long it's been since I last posted. Seems like the more I thought about it, the more I procrastinated. O well, I'm back.
I thought I'd share a charity hat pattern that the members of my mk guild have been making. It's more of a technique than a pattern. You get to use your favorite hat pattern that works with your machine, yarn and the size you want to make. My friend Bruce just posted on Ravelry a picture of the many he has made for charity. They are soooooooo cute. He used a rolled brim (fast) on his Brother KX350 midgauge.
So, without further ado, here is the technique.
I thought I'd share a charity hat pattern that the members of my mk guild have been making. It's more of a technique than a pattern. You get to use your favorite hat pattern that works with your machine, yarn and the size you want to make. My friend Bruce just posted on Ravelry a picture of the many he has made for charity. They are soooooooo cute. He used a rolled brim (fast) on his Brother KX350 midgauge.So, without further ado, here is the technique.
Machine
and Yarn: Use your favorite hat pattern for the yarn and machine you
are using to get the size you want. Once you get the number of rows
knitted you want for the height of the hat, transfer every 3rd
or 4th stitch over one stitch to the left to make eyelets.
(You need an even number of holes for the I cord to end up on the
outside of the hat. Cheat if you have to. It won't show after you
cinch it all up.) Put the emptied needles back to work, knit 2 to 4
rows. Do not remove from machine. Now make the flower “petals”.
Can be the same or different color than the body of the hat. Set
your machine to hold and *put/keep all but the right 3-4 stitches
into hold. On those stitches in work, knit 20 to 30 rows (depending
on how long you want each petal and which machine you are using). It
helps to hold down the petal loop with your left hand and run the
carriage with your right hand. Transfer those stitches the same
number of needles to the left. There will be two st on each needle
for the first row. Put the emptied needles out of work. * Repeat
from * to *. When you reach the last stitch group, knit the petal
and then hang the stitches back up, bind off.
Seam
the side of the hat.
Make
an I CORD: (to thread through the eyelets and cinch up.) Make a
tight I cord about 15 inches long. Thread through, cinch up the top
of the hat, tie a bow with knots at the ends of the cord. Voila,
done.
It's s very fun hat to knit and little girls love the frilly-ness. Make some for your favorite charity!
Friday, August 17, 2012
Machine Knit Tubes!
This may be the goofiest post to date, but thought I'd share anyway. If you don't have the same laundry set-up that I do, the first part of the post may be of no use to you at all.
Here's the deal. When I had my washing machine and dryer set up, the plumber advised me to buy these metal mesh tubes that attach to the hose that expells the water from the washing machine. The purpose of these metal tubes is to catch all the lint so it doesn't go down the drain. Our house is 80 feet to the main sewer and we are always afraid of tree roots, etc., and don't want to wake the sleeping giants. So I dutifully bought these deals. They are almost $3 for 2 at Home Depot. I found I was going through lots of them, like every two weeks or so and throwing them out. So I switched to panty hose and knee-high hose, of which I had a plentiful supply from my working days. I cut off the foot plus about 6-8 inches and hooked them onto the rubber hose, attaching them with a tightly wound rubber band. I felt pretty self-righteous to be using these up rather than tossing them. (ISH! Panty hose.) Anyway, they are now all gone.
So, having also a humungous stash of cotton, I decided to knit these tubes using a circular setting. On the Brother, push in the left part button on the main carriage and the right lever up. I don't know what the settings are for other machines, but your manual would tell you. I used a loose tension even though the yarn was thin, just so I'd get a meshy look to them. Start having the end closed with FNR, then switch to circular to make the tube. They are about 8" in total length, leaving a little to slip over the tube and secure with the rubber band. And about 7" in circumference. I suppose you could knit an I cord to run in and out of the tube top for a tie, but as soon as the idea hit my head, it left. Too much work.
I got on a roll and knit several of them. They actually last a bit longer than the metal ones because they are a little longer.
Now for another use for the tubes. Our guild knits hats, mitts and scarves for the Salvation Army. I like to use up yarn and make Gap-like, multicolored scarves. It's nice to knit them tubular so that you don't have any seaming to do. But those ends when you use different colors--whew, they are time consuming to work in. As long as you have to work in the ends, how about making them decorative? Make them wide enough for a warm scarf, of course. When you change colors, leave about 6-8 inches of both colors and alternate where you start the next color. When done knitting the scarf, bind off in your usual way. Then take a crochet hook and from the right side make v's by pulling up chains. Like this:
I copied the stitches from DAK, but DAK doesn't do sideways stitches, so I attempted to draw them in in the Paint program. Hopefully you get the idea from my terrible drawing. You probably want to do this to just one layer/ side of the scarf, then when the chains are done, knot the last one. With the needle, push the end into the center of the scarf. Pull up a bit, then snip so the end slips back into the center. It's just another idea if you need a change of pace. I seem to not do well with repetitiveness in my knitting, so I like to come up with something different.
Happy knitting!
Here's the deal. When I had my washing machine and dryer set up, the plumber advised me to buy these metal mesh tubes that attach to the hose that expells the water from the washing machine. The purpose of these metal tubes is to catch all the lint so it doesn't go down the drain. Our house is 80 feet to the main sewer and we are always afraid of tree roots, etc., and don't want to wake the sleeping giants. So I dutifully bought these deals. They are almost $3 for 2 at Home Depot. I found I was going through lots of them, like every two weeks or so and throwing them out. So I switched to panty hose and knee-high hose, of which I had a plentiful supply from my working days. I cut off the foot plus about 6-8 inches and hooked them onto the rubber hose, attaching them with a tightly wound rubber band. I felt pretty self-righteous to be using these up rather than tossing them. (ISH! Panty hose.) Anyway, they are now all gone.
So, having also a humungous stash of cotton, I decided to knit these tubes using a circular setting. On the Brother, push in the left part button on the main carriage and the right lever up. I don't know what the settings are for other machines, but your manual would tell you. I used a loose tension even though the yarn was thin, just so I'd get a meshy look to them. Start having the end closed with FNR, then switch to circular to make the tube. They are about 8" in total length, leaving a little to slip over the tube and secure with the rubber band. And about 7" in circumference. I suppose you could knit an I cord to run in and out of the tube top for a tie, but as soon as the idea hit my head, it left. Too much work.
I got on a roll and knit several of them. They actually last a bit longer than the metal ones because they are a little longer.
Now for another use for the tubes. Our guild knits hats, mitts and scarves for the Salvation Army. I like to use up yarn and make Gap-like, multicolored scarves. It's nice to knit them tubular so that you don't have any seaming to do. But those ends when you use different colors--whew, they are time consuming to work in. As long as you have to work in the ends, how about making them decorative? Make them wide enough for a warm scarf, of course. When you change colors, leave about 6-8 inches of both colors and alternate where you start the next color. When done knitting the scarf, bind off in your usual way. Then take a crochet hook and from the right side make v's by pulling up chains. Like this:
Happy knitting!
Monday, May 21, 2012
The Windmill Bag -- a hand knit converted to machine knit
A friend recently asked if she could share a pattern that I had converted from hand to machine knit. Since it was originally Danielle La Framboise's pattern, I didn't have any rights to it and also wanted to give Danielle due credit. With those things said, I think it's ok to post my mk version. Then I also realized I had never posted anything about doing this bag, so here it is.
If you would like to see the 500+ projects made from Danielle's pattern, go to :
http://www.ravelry.com/patterns/library/windmill-bag
I'm pretty sure you have to be a member of Ravelry to view, but if you're not, it's free and easy to join .
Windmill bag -- converted from hk to mk
Machine: Midgauge or bulky machine, no ribber
required so it can be made on any machine, really. Sample was knit on a SR 860 midgauge; multiply approx 1.7
the stitches and rows to make it on a standard gauge. Directions are
for the midgauge and the bulky machine will produce a slightly larger bag.
Yarn: I used Gjestal 100% wool, 50 gr = 100 meters (approx.
sport wt), 2 skeins pink, 2 skeins red, one skein white (Schuss Plus, Dale of Norway Heilo are all similar)
Gauge: not important, but I used T10. for best felting
Finished size: Mine, sitting flat turned out to be 18” tall x 12” wide. Yours may vary from this.
Notes: This is a very easy knit, suitable for beginners. Can
use any design pattern for the strips or knit it plain. The hand
knit version is garter stitch, the mk version is stockinette. I did
the knit and attach- as- you- go method so that there would be no
seaming to do. The HK version attaches the I cord ties at the end of
each strip, which would be just as easy to do. I did them last. The
original is cotton, not felted. Lining is optional.
Body of the bag.
Strip1: Ewrap cast on 30 stitches, knit 120 rows, bind off.
Strip 2, 3 and 4: RC 000. With purl side facing you, pick up and
hang 30 stitches along the bottom right side of rectangle 1. Knit 2
rows. *Pick up a whole stitch from strip 1 and hang onto the
leftmost needle of your new strip. Knit 2 rows.* Continue from * to
* until all stitches are hung from that side of strip 1. Continue to
RC 120, bind off around the gate pegs. Strips will be uneven.
Continue adding strips until you have all 4 knit and attached to each
other.
Here's a view of the bottom of the bag.
I cord tie straps and attached I cord trim.
Hope the picture is more helpful than confusing. Start out by making one tie strap. Ewrap cast on 4 stitches. Set
machine to slip one way/ knit the other to make cord. RC 000. Knit
180 rows (actually 90 knit rows). Do not remove from machine. Pick
a point of one of the purse points, with knit side facing you,
*Hang one whole stitch on left most needle. Knit 2 rows I cord.*
Continue around the V picking up every purse stich and knitting the
two I cord rows. When you get to the top of the next purse point,
stop attaching and Knit 180 rows of I cord. Bind off. For the next
V, cast on for the I cord and knit 2 rows. Begin attaching at the
top of the next V just under the previous I cord and attach the new I
cord in the same manner making a tie strap at the end of the opposite
side of the V. Continue around the purse until you have 4 ties and
all edges have the I cord trim.
Finishing
Sew in all yarn ends. Secure tightly the trim that meets a tie strap
so that when felted it looks continuous. The purse has a funny
shape , but it will take a better shape once felted. Put in the
washing machine hot/cold with some jeans and a small amt of
detergent. Do one or more cycles until the stitches are felted to
your satisfaction. I dried mine upside down on an empty, large (2
gal) laundry soap bottle that I just happened to not have recycled
yet. The
rectangular bottom fit the bottom of the purse exactly. Optional:
Once dry, put a stiff plastic rectangle at the bottom of the purse to
hold its shape. If you don’t like the look of the plastic, you
could knit or sew a cover/sleeve for it. Tie the straps however you
wish.
Several members of my mk guild made one of these and it was fun to see the "variations on a theme". It's also gratifying to know that you made the bag in a fraction of the time it would take to knit by hand. All that I cord by hand? Blech. Once again....yea machine knitting!
Dueling Raspberries
How cute is this??? Of course everything my grandson does is so clever!
http://player.vimeo.com/video/42525382
Sunday, May 13, 2012
Marley's Ghost...an unusual scarf to knit
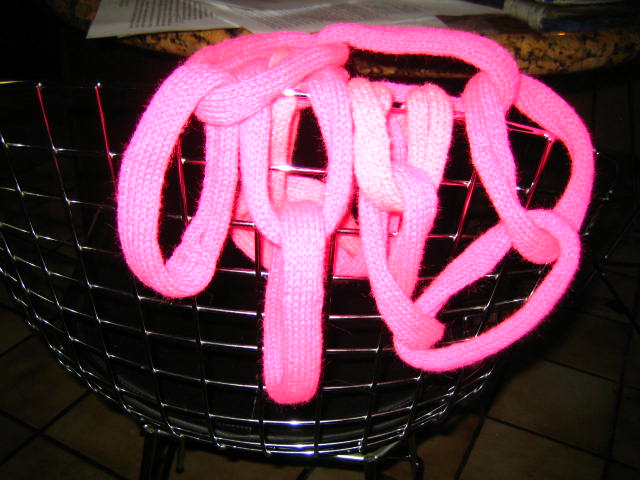
I've been wanting to knit this funky scarf for some time. It's a fun one to do and is really simple. Here are three versions of the chain link scarf:
HAND KNIT VERSION I believe the original idea (not 100% sure) was posted on Knitty. Here's the “link”appropriately enough to the hand knit version. The author called it “Marley's Ghost”. http://knitty.com/ISSUEwinter05/PATTmarleysghost.html It's fulled/ felted, so there's an idea for you. The circles ended up being more round than the unfelted version, it looks like. Eye-catching, no?
MIDGAUGE VERSION Knit by Jane N. who is a member of my mk guild, knitter extraordinaire. She casts on with contrasting colored waste yarn, knits main yarn 60 rows of 10 stitches in stockinette letting selvedge roll so that stockinette shows on right side. Leaves a tail of main yarn long enough to do the kitchener stitching. Knits 10 rows contrasting color waste yarn and removes from machine. Knits the rest of the strips, alternating black and color, 15 links in all.
Jane says,“This was such a hit with my god daughter that I made one for myself. It is surprisingly warm and made me into a scarf convert.” (She is 'janeknits2' on Ravelry if you'd like to see her other projects.) You can see her scarf on her project page. http://www.ravelry.com/projects/janeknits2/chain-link-scarf

STANDARD GAUGE I made one out of some neon hot pink yarn... hopefully some little girl will like it when our guild donates to the Salvation Army. I used a standard gauge machine, T8, Mary Lou's Symphony (any yarn that knits on your machine will work), 22 stitches, 80 rows of main yarn, 14 links. Notes: Kitchener stitch the first link into a circle. Remove waste yarn. Next links, slip one end through finished circle and kitchener shut to make a new link. Easiest to do kitchener stitch from the purl side and then roll it so that the stockinette side is outward. Difficult to take a pic without a person or a dress form....
Just a few ideas for you. Now and then I get bored with all knitting so I have to do something different. This filled the bill.
OH! and, Happy Mother's Day!
Subscribe to:
Posts (Atom)