machine knitting midgauge standard bulky machknit knit machine-knit patterns
Sunday, April 25, 2021
Classyhund
Thursday, April 15, 2021
Machine Knit Cotton Hot Pads
I am on a
mission to use up some of my huge cotton stash.
Have knit a lot of dishcloths, but thought it would be fun to be a
little more creative---and make something useful. I now have a cache of little gifts on hand.
Here’s how I
have done them:
*Used all cotton yarn and my standard gauge Brother 970
machine. My designs are approx. a gauge
of 7 st and 10 r to the inch, but it doesn’t matter. Mine end up to be between
7 and 9 inches wide by approximately the same height. You could use
wool---haven’t tried because I am trying to use up the cotton. You could also do these with a punch card
machine or knit them plain. But , where’s
the fun in plain???
*Start with
several rows of waste yarn with a quick cast on. Engage the design with your electronics, then
just knit not doing a permanent cast on with main yarn. I tried to be sure to do the design so that
the carriage ends at the right side when adding contrast yarn. The designs are
knit in one longish rectangle. Might
want to switch between KC I and KC II for some rows so you don’t have a
contrast yarn going all the way across the knitting for no good reason. When the design is done, the bottom row is
seamed to the top row.
* Some of your
designs may have long floats. Not to
worry. They add to the insulation
factor. I had no trouble with the
stitches not conforming to one another or splitting between stitches, but if
you do have this issue you can latch up the long float to a matching color. No
one sees the inside.
* You may
wonder why you need more rows in the middle of a design when both bottom and
top halves are the same. I found out the
hard way that you need about 4 rows to go around the “bend” when you seam
bottom to top or it’s off. If you only
want to do the bottom half of the design, that’s fine. Just remember to do the same rows as the
design and add 4 extra rows. Example—the
design is 86 rows. Knit the 86, do 4
rows plain, knit 86 rows plain.
*Adding a
loop in the corner is optional. I did
about 6 stitches x 50-60 rows, plain knitting since it curls like I cord
anyway. Looks nice if you hang the front
corner with wrong side facing, knit the loop, then pick up stitches from the
back side, knit a row and bind off. When
you seam the sides you can hide the purl bumps.
* To seam
bottom to top, you have two options:
-The Perfectionist option is to
take the piece off on waste yarn when the design is complete, turn it so the
right side is facing you, hang bottom to top stitches. Then bind off. The seam will be on the inside
and not show.
-The quicker, easier way is to
hang the beginning stitches onto the top stitches when the piece is complete,
then bind off around the gate pegs. You
will have a seam on the right side. I
think it looks ok. On one I ran out of main yarn right when I needed ONE MORE
ROW! So I used the contrast yarn to bind
off. So one row was main and one
contrast. I actually liked it--- it
created a decorative stitch.
* Options
for insulation for the middle of the hot pad--- I have used layers of
insulbright, >1 layer of flannel cotton fabric (laundered first), knitted squares of cotton yarn I didn’t like,
old cotton cut to size swatches, machine sewed around edges so they wouldn’t
unravel, cotton quilting batting, old clean towels. After completing the knitting, I turned it
wrong side out, then tacked the lining to the outer in several places, so it wouldn’t
shift. I used regular matching cotton sewing
thread. Doesn’t show if you take tiny stitches. When you are sure the lining won’t shift, turn
right side out.
* Finally, remove waste yarn and mattress
stitch the side seams by hand with right side showing.
I used
patterns that I have had in DAK for ages, some are built-in patterns, some are
purchased—lots of Dale of Norway patterns.
Some examples-----------Have
knitted abt 15 so far. Addictive. Can
you tell I love Norwegian designs???
Wednesday, March 10, 2021
Cotton Pullover for Grandson
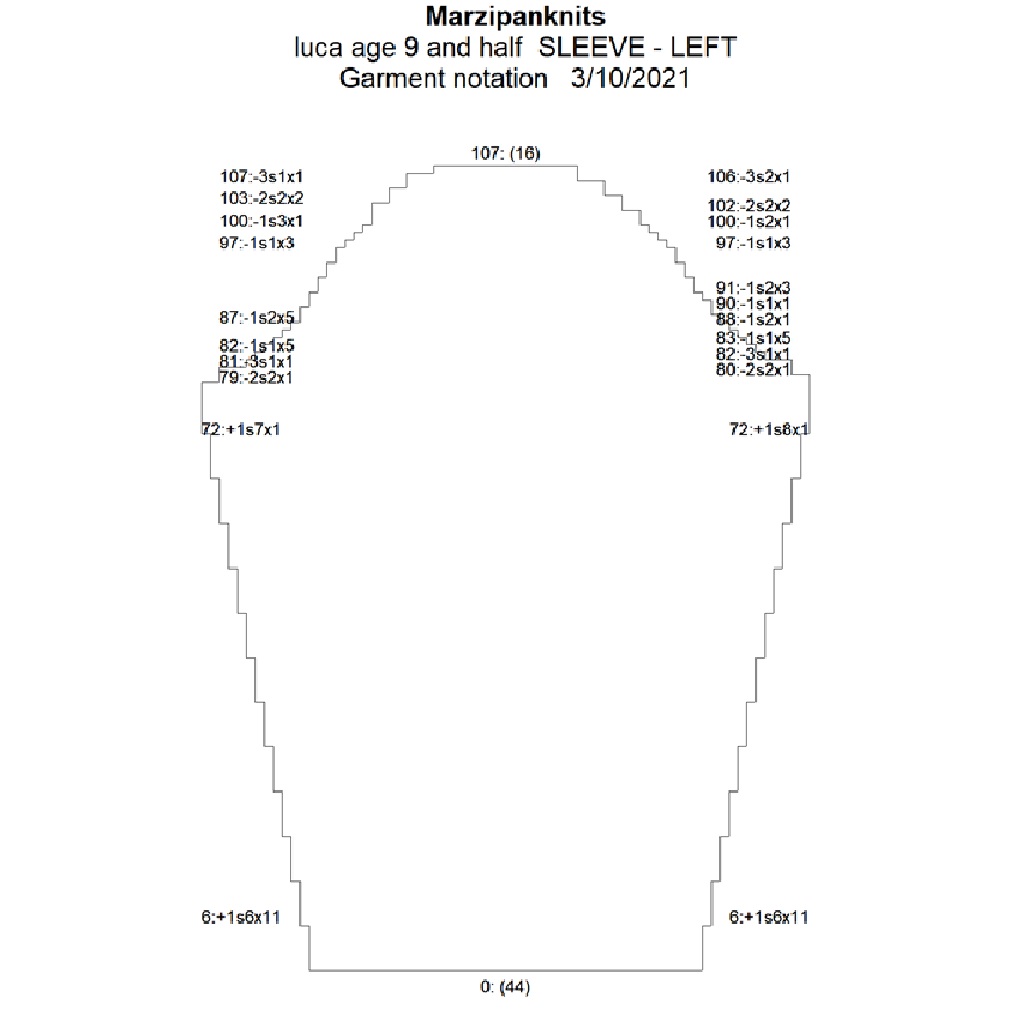
Finally got over my funk a little bit and did some knitting. Never contracted the carona virus and did get both of my Pfizer vaccinations. Dont' know what has been the problem. Hope to shape up and knit and post some more stuff. As always the picture doesn't do it justice. Really does look better in person. Weird dark shadowy rainy day today affecting the photo. The armhole decreases really are the same.
Just in case you have a 8-9-10 year old to knit for, here is a pattern you could use. Write to me if you can use the Designaknit file and I'll email it to you. Otherwise, you can follow the directions below.
Pullover for Luca age 9
Midgauge (SR
860 + ribber)
by Mar Heck
3-9-21
Notes:
* Used Conshohocken cotton yarn---has a core
that is roving-like with a stronger thread wrapped around. Shrinks terribly so I knit two gigantic
rectangles, guessed that it would be enough yarn to knit the sweater, washed in
hot water and dried in dryer. Then
re-wound onto cones. Should be
sufficiently pre-shrunk. Had to clean a
lot of fluff out of the dryer!!! It’s really soft, one positive thing to say
about it.
* Sweater is
a size 10 as measured by store-bought boys’ sweater.
* Gauge for
main pieces is 5 st and 6 rows to one inch at T6
* T 3/3 for
ribbing.
^sleeves 22 rows
^ front and back bottom ribbing 8 rows
^ neck 10 rows
Transferred rib stitches to main bed
and knit right to left with one row T 8 for loop through loop bind off.
* DAK shape
file is for the pieces not including ribbing.
* Start with
waste yarn and ravel cord for all 4 pieces.
When done, turn the piece upside down and do the ribbing. Bind off for the cotton yarn was nicer than
the cast on. First used a bind off
around the gate pegs and it flared too much.
Loop through loop looks better.
*
Neck is big because L wants to wear a cotton T shirt underneath and
doesn’t like tight necks. Can be
adjusted.
* Neck was
done with FF decreases one side at a time rather than short rowing. First time doing neck this way and I like
it. Easier to do with this machine than
short rowing. Needles kept popping into
work when short rowing, frustrating the heck out of me. Blue air.
Maybe need a new sponge bar???????
* This yarn
is hard to work with since it has NO
stretch. Next time will use an
easier-to-work- with yarn.
Now….what to do with all this extra pre-shrunk yarn?????
Sorry the numbers are a bit blurry. I can't seem to copy them so they show up well.
Wednesday, October 7, 2020
Easy Machine Knit Pillow Project
Too much time on the computer, too many movies, and too much political stuff makes for an odd existence these days. Can't seem to concentrate on anything too complicated, so I decided to use up some of my nice Brown Sheep wool and make some pillows for one of my couches. I hadn't used too many of the built-in patterns on my 970, usually preferring to do my own thing. Can't erase them from the CB1 so why not give some of them a try? So here goes my easy project:
The picture makes them look like they are different sizes. They really are all the same. It's the angle I took the picture from, I guess. The 3 in the middle are from the 970 (maybe also other Brother models ?) and the 2 end ones were downloaded from an old DAK file I had. I wanted to make them approximately 17" x 17" so at T 10 I cast on 120 stitches and knit 300 rows. My gauge was 7 stitches and 9 rows to the inch. If you want to make some to your specifications, you'll want to figure out your gauge with the yarn you plan to use. Close is probably good enough for this project.
I also
sewed a cotton fabric lining for each and used the lining to stuff with the
poly fiber fill. Didn't want the filling to work its way out of the
knitting. After sewing the lining shut I folded the knitting over it and
seamed the sides and bottom. Couldn't be much easier. Hope they
won't ever need to be laundered in my lifetime...
Monday, September 28, 2020
Baby Elf Hat on the standard gauge machine
I wanted to give this hat pattern a Norwegian name. So, I tried the Google translation
service for English to Norwegian and
here are some suggestions. Not sure
which would be most true.
Maybe a Norwegian
speaking person could help me out.
Anyway, here’s my first attempt at a 3-6 month hat. Pretty cute. The size seems ok, but I don’t have a baby to try it on. So this is my best guess. Will be donated, so size isn’t crucial right now. Finished dimensions (including ribs) are width at tip 6”, width above ribbing 5”, top to bottom of the neck 6”.
Yarn: from my stash, acrylic. Use something that gets close to this gauge. Mine had no label.
Machine: standard gauge with ribber
Gauge for
stockinette: 31 st = 4” and 37 rows =
4” @T 7.
Kinda weird, I know but close is ok I would think.
Directions:
Overview…
(knit from front of face to back of head)
1. 75 needles 1 x 1 rib. Do Susan Gualiumi’s nifty cast on for
rib. My new bestie because it lies
perfectly flat, no flare, but is still stretchy.
Use the manual’s cast on with
waste yarn, (zig zag row) insert rib comb, add one barrel weight in the middle,
do 3 rows circular, cancel circular and
knit about 1” of rib with this waste yarn.
Tension doesn’t matter so much here. Change back to circular and k the
last 2 rows with ravel cord. Snip waste
yarn and ravel cord. It’s ok if you forget to switch to ravel cord, but it’s
harder to remove at the end than it is when you use ravel cord.
2. Main part. With main yarn, T6/6 do the manual’s cast on again
and knit 12 rows ribbing.
3. Change to regular sinker plate and
transfer rib stitches to main bed. Knit
stockinette at T7 to RC 38, which should be about 5”.
4. Begin short rowing so that you get
the elvish point at the back of the head. Important to weight the knitting so the stitches don't pop off. Set machine to hold. *CAR put 7 N in hold at the left of the
knitting. Knit across, wrap the end st so you don’t get a hole. Put 7 needles on right in hold. Knit across to the right and wrap the end st.*
Continue from * to * until you have 5 stitches left in work. Put 2 in hold, knit across and wrap, put two
on right in hold, knit to the right.
5. Put all stitches back in work (or just
undo the hold setting) and knit 2 rows. Bind
off.
6. Stitch the back of the head seam by hand.
7. Bottom
neck ribbing. With the wrong side of the
knitting facing you, stretch out the bottom of the hat to pick up 70
stitches. Try to pick up in the ditch
between stitches at the same place across.
Knit 2 rows stockinette at T 10.
8. Change
sinker plate to rib, transfer every other stitch to ribber. At T 6/6, rib 12 rows. Transfer rib stitches to main bed and bind
off with your favorite bind off technique.
On this one I did around the gate pegs.
9. I cord Straps: I know some object to ties, but many babies do live after having had their hats tied under their chins, so I’m going with
it. If you have another method, have at
it.
Pick up 4 stitches at the bottom corner of one front. Set carriage to slip one way, knit the other. (Brother, one part button.) At T 9 knit 150 rows and bind off. Same for other side. Hide yarn ends and tie a knot at the ends of the ties.
Remove the waste yarn. There are a few yarn ends to hide. I did not steam the hat to block it, but you may want to.
Notes: You may also want to add a tassel or a pompom to the point of the hat and to the I cord ends. A fairisle pattern would be nice too. Because the seam at the back of the head can be bulky, next time I will take the top off on waste yarn and kitchener stitch the seam shut. This is an easy knit and a good way to practice short rowing if you are not used to doing that technique. I wouldn't say this is a fast knit because of the transfers between beds, but worth it, I think. If you don't have a ribber, a hung hem would do.
Thursday, September 10, 2020
Educats and Edudogs
Thank you for the interest in the Educat and Edudog blanket patterns. They are available for purchase using PayPal for $10.00 each. My label there is marsmachineknitting. You need to have DAK (any version) and an electronic machine to download to. I do also have a hand knitting version.
The blanket is lined as you go and the edges are bound with multi-color Icord. I have made mine with acrylic so they would be easily washable. Any yarn that works with your machine is ok as long as the different colors are the same weight. I think the blanket would be ok to do on a garter carriage for the front, although I personally don't have the patience. The idea is like an "I spy" quilt where you have the child find the cat who is sad or the dog that looks like Harry Potter, etc.
If you wish to purchase, just email me with the address you'd like the pattern to be emailed to and I will send you an invoice.
Thanks again. If questions, just email me.