machine knitting midgauge standard bulky machknit knit machine-knit patterns

Friday, December 31, 2010

Machine Knit Puppy Sweater

Well, I guess this is the last post of the year. I have knit a lot of stuff in 2010! I wonder if I'll match the amount in 2011. I suspect so---the addiction shows no signs of waning. Anyway, to my readers I wish you a Happy New Year!

We spent Christmas with our daughter in California. We were hoping to get some sun and warmth, but the weather was pretty awful. Her new puppy was shivering in the cold the whole time we were there, so I thought I'd knit him a sweater. The dimensions are hard to figure out even with measurements. She'll just have to try it and let me know what needs to be adjusted. The pattern is from the Caron website---called the Rainbow Pooch Sweater. You can find it at http://www.caron.com/projects/br/rainbow_pooch.html

It's a hand knitting pattern that I found easy to translate to machine knitting. I made the smallest size on my Silver Reed 860 midgauge with a single strand of Simply Soft. I followed the pattern fairly faithfully. Viewed from the side:
And, also viewed from tummy side
Oliver is a miniature dachshund. Cute as a button and full of personality. Never thought I'd knit a sweater for a dog, but there it is.

On to other things in 2011. That's going to be hard to get used to saying. Always seems to be the case...

Monday, December 20, 2010

Machine Knit UFO morphing to FO


Those who know me are aware of the fact that UFO's (unfinished objects, not the alien types) don't sit well with me. Can't stand to have something in the closet that isn't finished. This one has to be a record for me having sat around for 2+ months. I started this at a machine knitting retreat in October, wasn't sure I liked it, then decided yesterday to finish it. All I had left to do was the wide shawl collar. Easy enough for a machine with a ribber.


The pattern is "Kyra", a free pattern obtainable on the Berroco website. It was easy to convert from hand knitting to machine knitting. I changed the cuffs and bottom hem to Mary Anne Oger's stockinette, no- roll hem, which I love. It's a little hard to see because of the variegation in the yarn. I also love the asymmetrical aspect of this sweater, the shaping at the sides and the huge shawl collar, which I had to knit in two sections in order to have enough stitches.


I knit it on my Silver Reed 860 midgauge with ribber (the ribber was needed only for the collar). The rib isn't exactly like the rib in the pattern. A person could knit the sweater on the machine and then knit the collar by hand, but I don't have that much patience. Actually, I have to say the 860 does make nice ribbing. The yarn is Conshohocken cotton (lovely soft stuff) that I hand dyed. I knit up 3 large blanks and painted them with Dylon in wide swaths so the color repeats would be long. I machine washed and dried the blanks so all the shrinking is done. Some people think this is a lot of work, but the fact that the garment won't shrink appreciably is worth it to me. I unwound the blanks into balls and knit from there. I didn't make any attempt to match up fronts with the back and didn't try to make the sleeves match either. Artistic license, I guess.

It's for my daughter. Don't know if she'll like it at all, whether it will fit her or how the closure should go. Guess I'll just have to wait a week or so.

Saturday, December 18, 2010

Machine Knit Christmas Idea


Wanting some little extra Christmas items, I decided to make some table protectors/ hotpads/ trivet kind of things. I have a boat load of cotton yarn, so there is plenty of pretty red and white to use up. I used DesignaKnit to borrow motifs from various patterns I've stored. Mostly Dale of Norway Norwegian sweater hand knitting patterns that I've purchased. Any 24 stitch punch card or other electronic pattern could be used. Mine ended up to be about 8" x 8" give or take. You'd have to experiment a little with your yarn, if you want to try making some. I'm just partial to all things Norwegian, hence the Nordic look. And, can you tell that red is my favorite color????

They all are made of 3 strands of 16/2 cotton each color and my Brother 970 standard gauge electronic to which the patterns are downloaded. They are all close to 73 st wide x 91 rows long (182 doubled) to make a square. Different yarn would need to be experimented with (swatched) to produce a more or less square hotpad.
I started and ended with waste yarn, then the main pattern. The pattern is repeated twice lengthwise, folded and (off the machine) kitchener stitched together from the purl side so that both ends look pretty much the same. Turn the thing right side out and then sides are mattress stitched closed. I added a 50 row I cord to one corner just in case a person would want to hang one on the handle of an oven.

They seem to be pretty heat-resistant, but for extra protection a good idea is to put a square of heat resistant fabric in the middle before seaming it shut. (I can't remember what that stuff is called, but it has some metal like fabric with mesh on both sides. Quilted ThermaFlec Heat Resistant Fabric??? Something like that. )

It has been the perfect mindless project for me after knitting 29 ski hats and headbands for a local high school ski team. Am I ever glad that's done. Here's the hat, guys' headband and girls' headband. The school's logo includes an anchor since Minnetonka is a huge local lake. The suburb is named Minnetonka, as is the high school. I think the lake came first then the town, but I'm not sure. Anyway, knitting for profit rather than fun takes the joy out of it....until next year. The team mom promised a picture of the kids. Hope she remembers.

By any chance, did you notice that I've knit almost 20 miles worth of yarn this year? It's probablly more, because I forgot to record some of the things I knit. Pretty impressed with myself!

Thursday, December 9, 2010

Free machine knitting pattern for an easy scarf - "The Stripster"


Here's an idea for an easy, last minute gift. It's a quick knit, can be done with any yarns and any machine. Could probably be easily knit by hand too -- but why spend days when you can get this one done in short order? My vote goes for machine knitting any day for sure.
Machine: Any
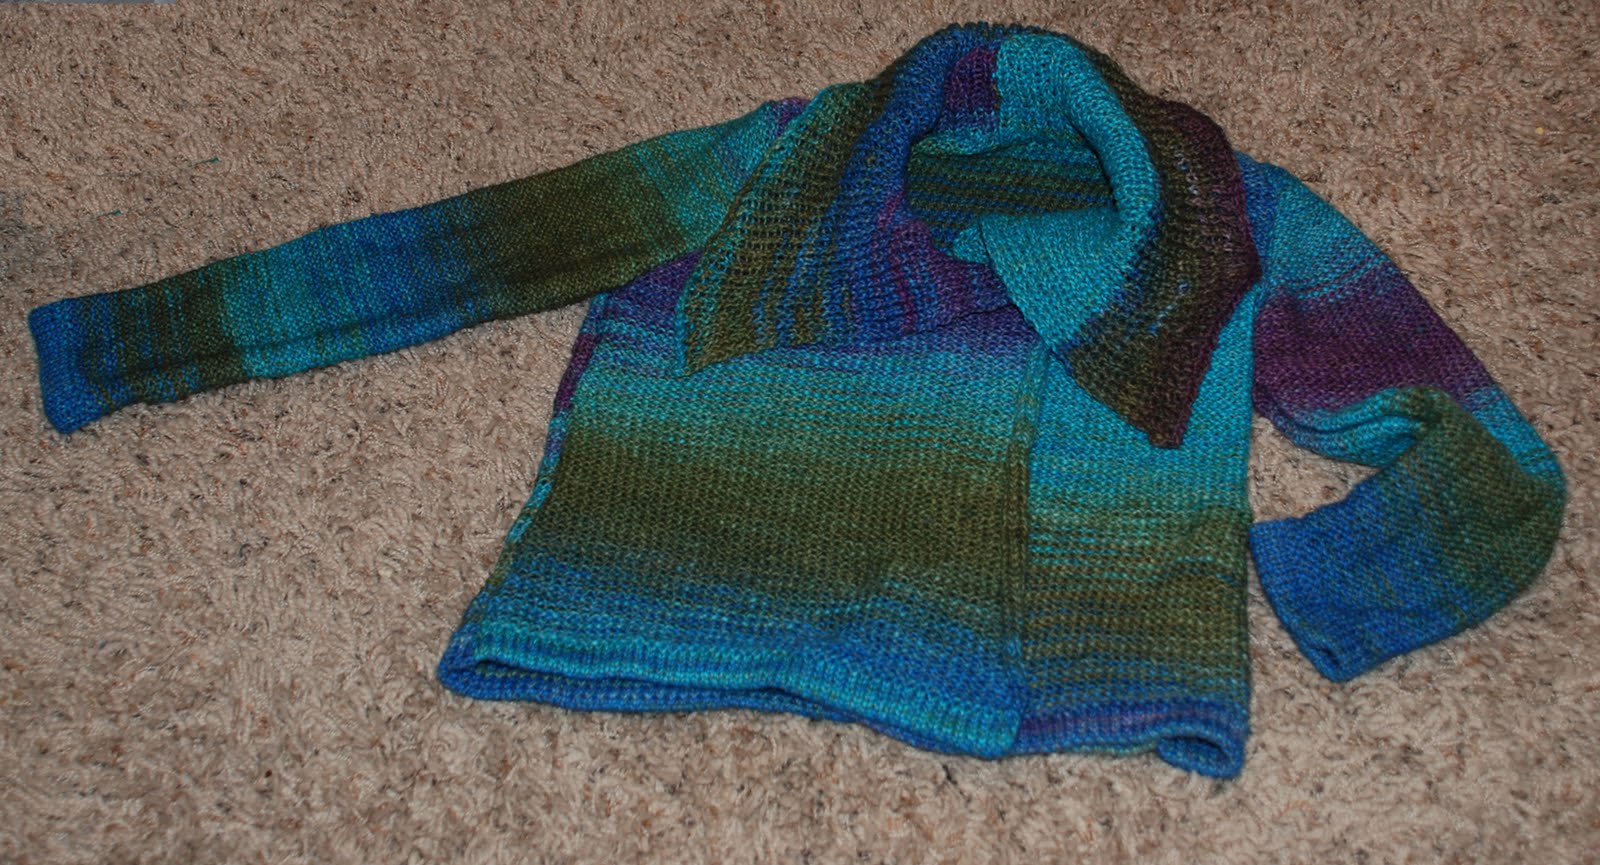
Yarn: Any- is a good pattern to use up yarn, but different yarns should be the same weight for smooth joins.
Gauge: I used largest tension on a midgauge with medium worsted wt yarn (4 colors of Caron Simply Soft) to get nice drape. Do a swatch or two to get the best gauge for your yarn. My gauge was 4 stitches and 4.6 rows to 1” on the midgauge.
Finished size: 11” wide (fully stretched, but it rolls in and scrunches up) x 5.4 ‘ long to wrap around the neck once and knot somewhat like an ascot. The end knots take up (shorten the scarf) about 2” each end.

The idea is to knit strips and attach strips as you knit. You can reverse the purl and knit side for each strip or keep the knit sides all the same and the purl sides all the same. You leave 40 rows unattached each end and knot for a “fringe”. Changing colors each strip, changing colors mid-strip or using hand dyed yarn would all give a nice effect. Knit time is about one hour!!! 4 skeins of Simply Soft will make 2, possibly 3 scarves. Normally I'm not too crazy about acrylic, but this brand is soft and I'm not sure whether the intended recipient likes wool or not.

DIRECTIONS for Midgauge (adapt for standard or bulky doing a little math to get the size you want):
Strip 1- Ewrap cast on over 10 needles. RC 000. T 10 knit one row, hang claw wt. Knit to RC 40, hang a marker. Knit to RC 260, hang a marker. Knit to RC 300, bind off. (Move wt up as you knit.)
Subsequent strips- Ewrap cast on over 10 needles. RC 000. T10 knit one row, hang wt. Knit to RC 40. With right or wrong side facing, begin hanging previous strip at the point of the first marker onto the leftmost needle of the new strip. *Hang a loop from the old, K 2 rows.* Continue from * to * until RC 260. Knit without attaching to RC 300, bind off. (Move wt up as you knit.)  Repeat from  to  for as many strips as you want the width.


For the midgauge I found that 4 strips made a nice width. For the standard I did 7 strips of I cords (the row count was also different. See Knitwords #53 for the pattern. Still available for purchase from the Knitwords website.) Pictured below, a little different effect but same principle of assembly.

Finishing: Run in the yarn ends, remove markers. Tie a knot at the very end of each strip. Voila’, you are done. Probably no need to steam. You don’t want to flatten out the knots.

Tip re hanging stitches: You want the loop not the knot on the edge of the previous strip. Once you get going, the previous loop will be stretched out. You don’t want that one again. Look above the stretched out one for the tiny knot and above that will be your next loop to hang. Keep unfolding the edge with the fingers of your left hand so you can see the loops and knots.