machine knitting midgauge standard bulky machknit knit machine-knit patterns

Monday, May 21, 2012

The Windmill Bag -- a hand knit converted to machine knit


A friend recently asked if she could share a pattern that I had converted from hand to machine knit.  Since it was originally Danielle La Framboise's pattern, I didn't have any rights to it and also wanted to give Danielle due credit.  With those things said, I think it's ok to post my mk version.  Then I also realized I had never posted anything about doing this bag, so here it is.

If you would like to see the 500+ projects made from Danielle's pattern, go to :

http://www.ravelry.com/patterns/library/windmill-bag

I'm pretty sure you have to be a member of Ravelry to view, but if you're not, it's free and easy to join .


Windmill bag --  converted from hk to mk

Machine: Midgauge or bulky machine, no ribber required so it can be made on any machine, really. Sample was knit on a SR 860 midgauge; multiply approx 1.7 the stitches and rows to make it on a standard gauge. Directions are for the midgauge and the bulky machine will produce a slightly larger bag.
Yarn: I used Gjestal 100% wool, 50 gr = 100 meters (approx. sport wt), 2 skeins pink, 2 skeins red, one skein white (Schuss Plus, Dale of Norway Heilo are all similar)
      Gauge: not important, but I used T10. for best felting
Finished size: Mine, sitting flat turned out to be 18” tall x 12” wide.  Yours may vary from this.
Notes: This is a very easy knit, suitable for beginners. Can use any design pattern for the strips or knit it plain. The hand knit version is garter stitch, the mk version is stockinette. I did the knit and attach- as- you- go method so that there would be no seaming to do. The HK version attaches the I cord ties at the end of each strip, which would be just as easy to do. I did them last. The original is cotton, not felted. Lining is optional.

Body of the bag.
Strip1: Ewrap cast on 30 stitches, knit 120 rows, bind off.

Strip 2, 3 and 4: RC 000. With purl side facing you, pick up and hang 30 stitches along the bottom right side of rectangle 1. Knit 2 rows. *Pick up a whole stitch from strip 1 and hang onto the leftmost needle of your new strip. Knit 2 rows.* Continue from * to * until all stitches are hung from that side of strip 1. Continue to RC 120, bind off around the gate pegs. Strips will be uneven.
Continue adding strips until you have all 4 knit and attached to each other.
      Here's a view of the bottom of the bag.

I cord tie straps and attached I cord trim.

Hope the picture is more helpful than confusing.  Start out by making one tie strap. Ewrap cast on 4 stitches. Set machine to slip one way/ knit the other to make cord. RC 000. Knit 180 rows (actually 90 knit rows). Do not remove from machine. Pick a point of one of the purse points, with knit side facing you, *Hang one whole stitch on left most needle. Knit 2 rows I cord.* Continue around the V picking up every purse stich and knitting the two I cord rows. When you get to the top of the next purse point, stop attaching and Knit 180 rows of I cord. Bind off. For the next V, cast on for the I cord and knit 2 rows. Begin attaching at the top of the next V just under the previous I cord and attach the new I cord in the same manner making a tie strap at the end of the opposite side of the V. Continue around the purse until you have 4 ties and all edges have the I cord trim.

      Finishing

Sew in all yarn ends. Secure tightly the trim that meets a tie strap so that when felted it looks continuous. The purse has a funny shape , but it will take a better shape once felted. Put in the washing machine hot/cold with some jeans and a small amt of detergent. Do one or more cycles until the stitches are felted to your satisfaction. I dried mine upside down on an empty, large (2 gal) laundry soap bottle that I just happened to not have recycled yet. The
rectangular bottom fit the bottom of the purse exactly. Optional: Once dry, put a stiff plastic rectangle at the bottom of the purse to hold its shape. If you don’t like the look of the plastic, you could knit or sew a cover/sleeve for it. Tie the straps however you wish.


Several members of my mk guild made one of these and it was fun to see the "variations on a theme".  It's also gratifying to know that you made the bag in a fraction of the time it would take to knit by hand.   All that I cord by hand?  Blech.   Once again....yea machine knitting!

Dueling Raspberries

How cute is this???  Of course everything my grandson does is so clever!

http://player.vimeo.com/video/42525382

Sunday, May 13, 2012

Marley's Ghost...an unusual scarf to knit

I've been wanting to knit this funky scarf for some time. It's a fun one to do and is really simple. Here are three versions of the chain link scarf:
HAND KNIT VERSION I believe the original idea (not 100% sure) was posted on Knitty. Here's the “link”appropriately enough to the hand knit version. The author called it “Marley's Ghost”. http://knitty.com/ISSUEwinter05/PATTmarleysghost.html It's fulled/ felted, so there's an idea for you. The circles ended up being more round than the unfelted version, it looks like. Eye-catching, no?
MIDGAUGE VERSION Knit by Jane N. who is a member of my mk guild, knitter extraordinaire. She casts on with contrasting colored waste yarn, knits main yarn 60 rows of 10 stitches in stockinette letting selvedge roll so that stockinette shows on right side. Leaves a tail of main yarn long enough to do the kitchener stitching. Knits 10 rows contrasting color waste yarn and removes from machine. Knits the rest of the strips, alternating black and color, 15 links in all. Jane says,“This was such a hit with my god daughter that I made one for myself. It is surprisingly warm and made me into a scarf convert.” (She is 'janeknits2' on Ravelry if you'd like to see her other projects.) You can see her scarf on her project page. http://www.ravelry.com/projects/janeknits2/chain-link-scarf
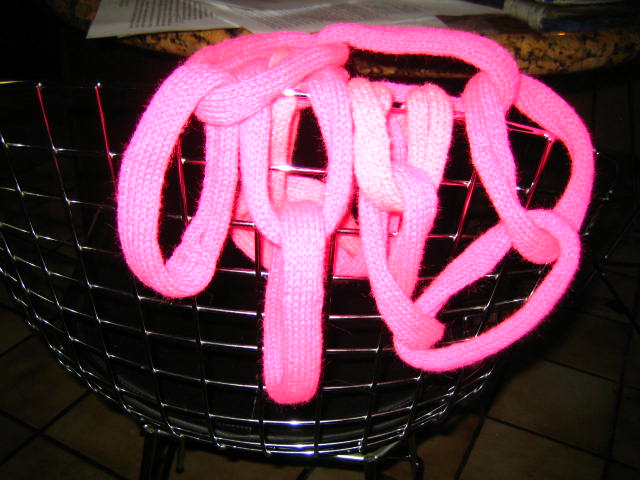
STANDARD GAUGE I made one out of some neon hot pink yarn... hopefully some little girl will like it when our guild donates to the Salvation Army. I used a standard gauge machine, T8, Mary Lou's Symphony (any yarn that knits on your machine will work), 22 stitches, 80 rows of main yarn, 14 links. Notes: Kitchener stitch the first link into a circle. Remove waste yarn. Next links, slip one end through finished circle and kitchener shut to make a new link. Easiest to do kitchener stitch from the purl side and then roll it so that the stockinette side is outward. Difficult to take a pic without a person or a dress form.... Just a few ideas for you. Now and then I get bored with all knitting so I have to do something different. This filled the bill. OH! and, Happy Mother's Day!

Saturday, April 28, 2012

Baby Pullover in English Rib

I haven't been knitting a lot lately, but have managed to use up some stash yarn to make this easy baby pullover for charity. Give it a try and see if you don't also think it's one of the easiest things you've ever knit (if you use your ribber, that is.)
English Rib Baby Sweater mar heck 4-22-12 Yarn: Mary Lou's Solo, approx 1/3 cone (I got 3 baby sweaters out of one full cone with yarn to spare.) Size: 12 months (18 months in parenthesis) Machine: standard gauge with ribber Notes: I started with Diana Sullivan's charity sweater pattern that is similar but I couldn't get gauge with my chosen yarn, so it's modified with thanks to Diana for the original. The pattern consists of 4 rectangles. No shaping is required because 1 x 1 ribs are tighter than the English rib for cuffs necline and bottom. The sweater has a boat neck and ¾ sleeves. Don't fret when the piece first comes off the machine. It will look long and skinny, but pull it both directions and let it sit for a while. It will relax to the correct dimensions. Directions: Knit one front and one back the same. For the bottom rib, cast on per your manual over 67 (71) needles, 1 x 1 rib. Tension 0/0. Do one zig zag row, hang ribber cast on comb but don't hang wts yet. You'll have a nicer, less flutey edge. Set machine for circular and knit 3 rows. Change to regular 1 x 1 rib and hang 2 large ribber wts. Knit 8 rows 1 x 1 rib at T 5/5. Change to English rib. (for Brother put the left 2 levers up on the ribber carriage—check manual for other machines). T 5​/5 RC 000 Knit to RC 110 (122). RC 000. Change to 1 x 1 rib again and K 8 rows. Tension 10/8 , feed yarn loosely, and knit right to left. Transfer ribber stitches to the main bed. Latch tool loop through loop cast off. Makes a nice edge for the neck. Sleeves Cast on in the same manner as above over 61 (65) needles. And knit the cuff the same as the bottom rib for 8 rows. Change to English rib, T 5/5 RC 000, knit to RC 59 (71). Change to regular 1 x 1 rib setting, knit 1 R T 10/8 from left to right. Transfer rib stitches to main bed and bind off around the gate pegs as loosely as you can. This last row gets hidden in the armhole seam.
Finishing: Seam 2 inches of the front and back for each shoulder making sure the opening is large enough for a baby's head, seam sleeve to body using a back stitch, sew side and sleeve seams with a mattress stitch. Ahem. Make sure the textured stitches are the public ones for each piece. Optional-as you knit the top rib of one of the pieces, make a small button hole each side about an inch in from the shoulder by transferring a rib stitch to the main bed and leaving the needle in work. Then when you seam the sweater, overlap the front and back a little and sew the overlapped part into the armhole seam. Sew on small buttons. This allows for a looser neck opening and easier dressing for the baby. Also optional- knit a different colored yoke for the front and back or knit stripes suitable for a boy or girl. Expand the pattern for a larger size by adding stitches and rows in the same incremental amount for each additional size. Because this sweater knits up so quickly, it would be an excellent charity sweater for our MN Visiting Nurses to hand out. Suggest you put a little tag on saying machine wash and dry, ¾ sleeves (so they don't think it's an off size.) Closeup of sleeve seam and neck.
Sorry about the directions being one big blob. Blogger has changed and I've not got the hang of it yet. Will study up and if I figure it out I'll revise. Thanks for your patience. And an update of my gorgeous grandson who is now 7 months old!

Thursday, March 8, 2012

The Static Monster Revisited


I decided to knit a scarf for my daughter's chiweenie, Oliver, because he's always cold. I knit it in the round and was disturbed to see, when it came off the machine, that there was a stitch that intermittently tucked. (See the white pointer.) O well, he's a dawg, so I gave it to him anyway. At first I thought I had a bad needle latch so did some switching of needles. But when I knit a sample again, a different needle tucked. In fact a bunch of them tucked where they were supposed to be plain stockinette. Grrrrrrrr. I should have realized sooner, this was the dreaded static monster coming to roost upon my machine. After implementing a bunch of anti-static measures, I was able to knit other things with no problems.

If you find the carriage really hard to push or it glides easily one way and not the other, you find the machine mispsatterning, or if you step up to your machine, touch the metal and get a shock, it's not hard to deduce, you have a static problem. Other symptoms of static include yarn jumping over needles and not knitting through or mispatterning of design. Natural fibers seem to have less static than man-made, but natural still does get static. In fact Ollie's scarf is 100% wool. When it starts, you can't believe it's true! Here are some suggestions to deal with it. If you find that your machine is acting like it's possessed, give one or all of these suggestions a try.


1. Spray your yarn with Lori Lynn Yarn Spray or Static Guard. Lori Lynn isn't being manufactured anymore, but some dealers still have a supply of it. If you find, grab. LL does have an odor---I don't think it's objectionable. To me smells like vanilla. Put the yarn in a garbage bag, spray, close and let it sit overnight to soak into the fibers. If you don't have the time to do that, just spray all sides of the cone every so often. I've been known to spray Static Guard onto a soft cloth and rub the machine down with it.

2. Rub down all parts of your needle bed and carriage with a dryer sheet (i.e. like Bounce).

3. Attach the dryer sheet to the mast and let the yarn run over it.

4. Stand on an anti-static mat like those used in factories. Put another mat under your cone of yarn. Some have said they are available at office supply stores. I have one that a friend gave me. She cut it in half --- one piece for me to stand on and one for the yarn to sit on.

5. Get an anti-static bracelet such as the computer technicians use.

6. Leave a humidifier running in your knitting room. If you can, direct it right at your cone of yarn.

7. Purchase a copper mesh from Northtipton that grounds your machine. The kit used to be about $10.00. The kit has copper mesh with grounding wires.

8. Oil your machine per manual. Often.

9. Slather hand lotion on your hands every so often. (Suggestion from Carol Wurst at Rockinghorse Farm.) If it doesn't stop the static, you'll still have lovely soft skin.

10. Use wax on the yarn mast to let the yarn glide over it. Most machines come with some but yours may be lost or used up. You can make your own with parafin and the molds that tea candles come in. Melt, pour, let harden, release from mold, drill a hole with a small heated knitting needle. Then attach to the mast. On Brothers, there's a post that sticks up that the wax fits on.

12. Put your yarn in the freezer overnight.

13. After you get a row or two done, pin one of those little brass pins to your knitting. Remember when we wore slips and were told to do this to prevent static? Worth a try.

13. Offer incense and a static dance to appease the static gods.

There may be other ideas you know about to calm the static monster. And if so, I'd love to hear about them. I seem to be a prime candidate for the problem.

Tuesday, March 6, 2012

Still Vertical


It's been such a long time since I last posted. I had surgery a month ago and my daughter and grandson spent 2 weeks with me to help in recovery. Best medicine ever!
He was able to wear some of the knits I made for him since it was truly winter here. Here's the cute Norwegian sweater:

Here's the original post re this sweater. http://marzipanknits.blogspot.com/2011/06/four-star-norwegian-sweater-for-baby.html

My darling grandson is 5 months old now.

I treated myself with Photoshop Elements 10 to use on my new Windows 7 laptop. My old Photoshop wouldn't work with 7, so I had to bite the bullet. Actually, I found Photoshop 7 to be pretty difficult. I'd learn a technique and promptly forget how to do it. Elements is more user friendly with lots of things automated. I'll never be a professional photo editor anyway, so I like the ease of use. I've been watching YouTube tutorials on PSE10 and they're helpful.

I plan to get back to machine knitting soon---and will post more free patterns and patterns for sale in the near future! Stay tuned!