machine knitting midgauge standard bulky machknit knit machine-knit patterns

Saturday, March 26, 2011

Elvish Feet


Since winter is hanging on through March it appears, I'm still in the mood to felt slippers. This is another version of Kris Basta's slipper pattern with a couple of twists. I knit 12 rows for the cuff instead of 6 and hung a hem. Makes a nice, sturdy edge. Then I did stripes, changing color every 4 rows. I just carried the yarn up the side without cutting it. Then I made the leaves. Here's how:

Using the same tension as the slippers, ewrap cast on 3 stitches. Knit 10 rows. Hang a hem with first stitches on top of the 3 in work. Knit 2 rows. You'll leave the very center stitch as is. Move one edge stitch out one needle both sides. Pick up the purl bump and hang it on the emptied needle. Knit 2 rows. Move two edge stitches out both sides one needle and fill in with the purl bump. Continue like this, moving one more stitch out than the previous time both sides of the center stitch, filling the emptied needle with purl bumps and knit 2 rows===until you have 15 stitches in work. Knit 4 rows. Take off each leaf and store it on a garter bar or hand knitting needle. Make 6 leaves for each slipper.

Now sew the slipper together. Sew 3 leaves on the front and 3 on the back cuff, spacing them evenly just under the lip of the cuff. You'll have a few more leaf stitches than there are cuff stitches. Every now and then, pick up two leaf stitches to gather them. This will make the leaf point down rather than straight out. I sewed the sides of the bottom of the leaf together so that once felted it looks like a tear drop, no hole evident.


Yes, I do know they're silly. But I like them. Anything to cheer up this endless winter!

Monday, March 21, 2011

Head and Shoulders Knees and Toes, Knees and Toes

Oh no. That's the kids' song. Today's post is about shortrowing heels and toes. I have a little trick for you to remember what to do.

A friend who is a little unfamiliar with short rowing wrote and said she wished there was more information on the slipper pattern as to how to do this. In case it helps someone else, here's how to short-row the heel and toe for Kris Basta's slipper pattern (mentioned in the previous post).

Set the carriage to hold. I use the COLORADO abbreviation to help myself remember what to do. (C standing for carriage side and O standing for opposite side of the carriage.) I had to come up with a mnemonic because I tend to daydream when I knit. Kinda lame, but it works for me. You do the shortrowing carriage side on the way in, making the heel or toe smaller and you do your shaping opposite the carriage on the way out. Remember to put a claw wt each side right where you are short rowing and keep moving them as more needles get put into hold so that the stitches stay firmly in the hooks.

So, you have 27 stitches and the carriage is on the right, you've finished your cuff. Put the end needle closest to carriage in hold, knit across. Put the next end needle closest to the carriage in hold, knit across. (Don't need to wrap anything.) Continue doing this until there are 11 stitches still in work in the center and you have knit across. Now do the Opposite side of the carriage into work, one needle opposite the carriage in the center. Knit across. Put the end needle in the center opposite the carriage into work, knit across. Continue in this manner until all needles are back into work and then do the next section of the slipper. (After the heel you 'll be doing the sole of the foot and after the toe you'll be doing the instep.)

To put needles into work, you can usually just push the needle in so that just the latch and hook of the needle show. But you don't want to drop these stitches because they're really hard to pick up. If you're unsure, just use the one-eyed tool to put the stitch back into work. (Takes a little longer, but less risk of losing it.) I can just push the needle in to make it knit on all my machines except for the little manual plastic Brother 350. The needles have to be all the way back to B position to be in work. No lee-way.

There are more elegant ways of shortrowing heels and toes for socks, but since your stitches get obliterated in the felting process in this slipper pattern, this is a fine way to do it. And easy. Check out how smooth my toes and heels look in the previous post.

Hope I helped someone. Will become automatic and fast if you do it enough times.

Friday, March 18, 2011

Felted Slippers on the Bulky Machine


Once in a while you come upon a great pattern that is zippity quick, simple to make and turns out great. (Rhymes!) Yesterday I knit Kris Basta's Bulky Felted Slipper. You can find the pattern in the files of the Yahoo machine knitting group. Her website is http:KrisKrafter.com/
She sells newly designed garter bars too, if you're interested. It is a great pattern for my recently enhanced Schuss Plus wool "collection". Kris has also given permission for me to use the pattern in our guild's newsletter. We're knitting slippers for the troops and they have to be either acrylic or felted because of the way stuff is washed in the service. A local organization ships them for free for us!

Never ever being content to leave well enough alone, I did make a couple of mods to the pattern. I wanted the heel to ride up a little higher in the back so knit 2 rows before shaping the heel. (Probably didn't make a smidgeon of difference. Could have done more, but they look and feel fine as is.) I knit them at T 10+ on my bulky rather than the T 7 she used. Don't know why other than I always use the largest tension when I'm felting something. It meant that I had to run the washing machine load 3 x to get them to felt way down. I knit 36 rows rather than 40 for the foot. It just looked like it was getting toooooooooooo long, so I kind of panicked. Finally, I seamed them by hand using a stitch that abuts the edges to lie as flat as possible. I believe she seamed hers on the sewing machine. Not huge changes, I'll admit. Next time I might follow her suggestion to pad the foot. I bet they would last longer that way.

Confession---I know better---but I felted them the last time with a white terry towel among other things in the load. It left a lot of linty fibers on the slippers. Crap. I spent some time pulling these off and "shaving" them so they looked new again. Won't repeat that performance any time soon!

Anyway, I think they are super attractive. The style would suit a man or woman I'm thinking.

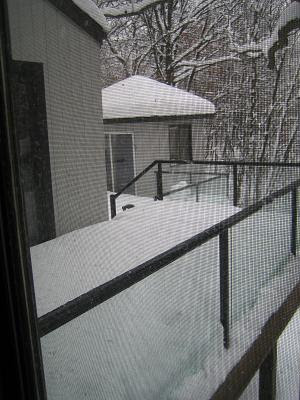
You can see in the second picture that we still have snow on the bottom deck even though the temps have been in the 50's the last few days. Picture was taken out my craft room window. ugh and aargh.

A scan of the bottom of the slipper:

Thursday, March 17, 2011

Better to make it into a hotpad than eat it!


Stash put to a useful purpose! I have a lot of cotton yarn. Like cones and cones of it. So I made some hotpads with it--like the Christmas ones I did a few months ago. To make sure they would really protect hands from burning, I cut a same sized square of "Insulbrite" and tacked it down in the center before seaming. They turn out fairly thick and substantial. The many long floats actually help with insulation and you don't really have to do anything with them since they're hidden on the inside. After seaming I give them a shot of steam---cotton can take a lot of heat---and this way the floats are set.

I've made several now and the size that seems to work best is 71 stitches x 170 rows on the standard gauge machine. Couldn't tell you the number for the yarn weight but it's a couple of strands of thinnish yarn for each color. I start and end with waste yarn. Remove from machine. Rehang with right side facing me and push to the back of the bed. I bring up the other end and hang in the hooks of the needles. With a straight edge, I push the front stitches through the back and then bind off with the latch tool around the gate pegs. Like in sewing, this puts right sides together and the bottom seam is hidden on the inside. I did a couple of them doing a kitchener stitch closing on the ends, but it took too long. The side seams are mattress stitched after the lining is tacked down.

The internet has some clever kitchen sayings if you care to make some. Just Google "funny sayings" or something like that and you'll get a ton. DAK makes it easy to design and download them. To make them quick to knit, use all capital letters so you don't have to wrap the sides of the words. This one isn't that funny, but belies the Norwegian-American heritage. I have read that this tradition of eating lutefisk and lefse at Christmas came over to this country with the poor (monetarily poor) immigrants and that most people in Norway wouldn't touch lutefisk. In our family, it became a traditional Christmas Eve dinner and you had to have just one bite to make it through the coming year. The lefse is awesome, though. Strangely enough, or maybe to prevent starvation, we also had Swedish meatballs for the Christmas Eve dinner! That lutefisk is awful stuff---like fish jelly---but the butter made up for it a little.

PS For those NOT in the know..."lefse" rhymes with "betcha", both being two syllable words doncha know.

Monday, March 14, 2011

Helix-- Seaweed --Ruffled Scarf


Look what came in my email inbox TODAY from Knitting Daily (Interweave Knits). You can get the free hand knitting pattern by signing in to their website. The pattern has several beautiful examples of their Helix Scarf made from homespun yarn. Most of them are garter stitch, so no worries about the edges curling. They do use short-rows on both sides to make the ruffling effect. I do like the fact that a person wouldn't have to felt the scarf to get it to behave. The over-all effect of the scarf surelooks a lot like mine, though. (I'm not implying anyone copied anyone by any means. Just pointing out the similarities.) I think it looks a lot like sea weed.

But I guess my point is that I still prefer 1 1/2 hours to the days it would take to knit this thing. There are too many things in the world to try to be stuck on one project for that long. Kudos once again to machine knitting!

Thursday, March 10, 2011

Ten Feet of Fabric Machine Knit


How long would it take me to knit ten feet x 45 stitches by hand on size 10 needles? A month at least, I'd guess. By machine: 1 1/2 hours! YES! And that was with some yarn issues that kept getting caught in the mast. (Old stuff, probably a little moth issues on the outside of the cone, but can't be sure. Or it just was defective.) Anyway, back in the knitting mood once again.

I wanted to knit a felted wool ruffly scarf but not spend too much time short-rowing or doing any other kind of patterning. So, using my SR midgauge machine, in the mood for flying by the seat of my pants, I cast on with a closed edge over 45 needles, knit with the first color 330 rows (an arbitrary number, the length of which seemed about right) plain stockinette. Then I switched to the second color and knit another 330 rows and bound off. This entire piece was ten feet long! After the fact, the gauge calculation turned out to be at T 10+ 4.5 stitches to an inch producing about 10" in width and 5.5 rows per inch producing the 10 feet. The 10 feet are needed because the felting and the ruffling takes up about 4 feet of the length.

Then I felted it in the washing machine for about 10 minutes. Removed it even though it was still damp. I used a large-eyed needle and a long piece of the first color yarn doubled. Back-stitched up the center, doing a knot every few inches, gently ruffling and pleating it as I went. Knotted it at the end of the first color, the middle of the scarf. Then I did the same with the second color and put it back in the washing machine to finish felting. The hand stitching pretty much melted into the scarf.

The gently rolling ruffles stayed in place and I just had to snip off some yarn ends. Didn't like the ends of the scarf very much so when it was dry I cut off both ends with an ordinary scissors, just a free-hand curve. The sides looked really curled in before felting, but afterward had a nice edge---as though I planned it that way!


The only thing I don't like about the scarf is that it's really heavy. I used Schuss Plus, 100% wool, which is a light worsted weight. I think a finer wool yarn would make a nicer, dressier scarf, but it turned out ok considering the flying-by-the-seat-o-my pants method used. Certainly used up some yarn!!! And we still need the warmth around here.

I used the little Canon PowerShot my daughter gave me. Finally figured out how to turn off the flash. (I think Tracy told me how to do that a long time ago but I forgot.) But when you turn off the flash, the aperture gets bigger and the shutter stays open longer, you really need a tripod. So that's my story with the blurry pictures.

Wednesday, March 9, 2011

That was then...this is now

I'm back! I was in sunny, warm Florida for a respite. Here's the spot.


And...this is what I came home to. I thought (foolishly) that some of the snow would have melted. Ha. A friend predicted it would be around until next winter. Ouch.Both of these pictures were taken from inside the house, through the screens even because you can't walk around the house. The snow is 3-4 feet deep.

Both places are picturesque in white----whitest beach you ever saw and white snow. Same planet. Hard to believe.