Oh boy. I know it has been an awfully long time. I have lots of reasons both positive and negative, but I'll skip that part. Move right along if you are not interested in gnomes. What follows is a simplistic description of how these cuties were made. You can congratulate me on recycling every piece of them.
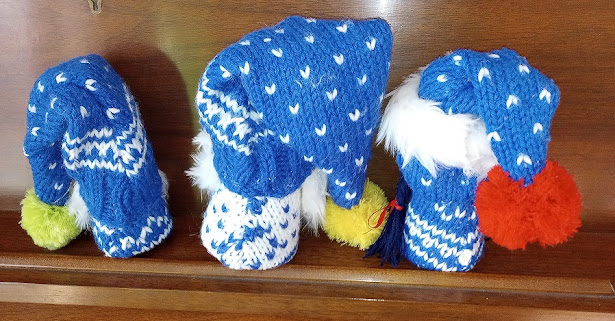
I should have been done with gnomes, nisse, by now, but I still think they are cute, especially for Christmas. These were given to my daughter for their fireplace mantel as a Christmas decoration. Mom, dad and child. Here's what I came up with:
My ingredients--
*an old Norwegian sweater that I made with my very first knitting machine 30 years ago (yikes, I must have been only 9 years old!)---a sweater that I haven't worn for eons
*a sharp scissors
*paper to make cone patterns
*3 empty cardboard yarn cones cut with box cutter to 6", 8" and 10" heights
*glue gun and lots of glue sticks
* pom poms
*fake fur fabric
*nylon and a little stuffing for noses, needle and thread, pink blush
*yarn and ribbon for braids
*snowflake buttons for the boys
How I made them:
After cutting the cones to the various heights (surprisingly easy to cut), I rolled them onto a piece of paper to make 3 patterns.
Then I cut out pieces for the bodies from the sweater, using those paper patterns. I glued them onto the cones as quickly as possible so that the pieces wouldn't unravel. Hate that glue gun==== I always burn myself. But the artist has to suffer, don't you know. I tried to tuck in the raw edge of the seam down the backs, but they don't look too pretty. These are the backs. Extra fabric was tucked up into the cone and glued down, ouch.
Next I made
noses by cutting 3 circles from an old clean nylon. Hand stitched around the circle, cinched it up and stuffed them with a bit of fiberfill. dabbed some pink blush onto them.
From the fake fur I cut out two
beards and a
brim for the girl's hat. Just eyeballed the shapes and sizes. The beards are basically triangles. When you cut this weird fabric it works best to draw the shape and cut from the back side. Slide your scissors under the fur to lose as little of it as possible.
From the sleeve bottoms of the sweater I cut triangles for the 2 boys' hats. Nice to have ribbing for the bands of the hats. For the bottom of the girl's hat I just cut a triangle from the body of the sweater, planning to tuck the edge and glue it in place. These triangles were about 8" long tapering from the circumference of the head to the tip. With right sides together I seamed the hats, stitching by hand. All 3 hats got a pom pom glued to the ends.
The order of doing things was this:
*glue sweaters onto cones for bodies
*glue on beards
* glue noses in place and add a bit of pink blush
*make 2 braids out of yarn and secure with bows. (daughter is Korean so braids are not blonde)
* pull hats on, having the back lower than the fronts and covering parts of the noses. Glue the boys' hats all around. Glue buttons onto boys' hats and a band of fur onto the girl's hat. Tuck under bottom of girl's hat to cover tops of braids so no raw edge and glue in place.
I probably could have added something inside the cones to make them heavier, but they seem to stay upright ok. Also didn't add a circle to cover up the bottoms, but could have.
Done! Have a good chuckle at how ridiculously cute they are and compliment yourself for keeping some stuff out of the landfill.


