machine knitting midgauge standard bulky machknit knit machine-knit patterns

Wednesday, February 18, 2009

Still hat weather here...


Winter has let us know in no uncertain terms that it is still with us. The temp was 17 F today, but it felt like minus 17 F with the wind as strong as it was. I'm ready to call it a done deal and get on with spring. At least the sun was shining today. That helps.

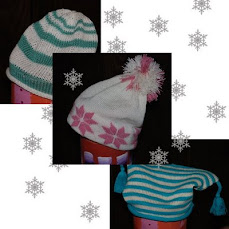
I had promised myself that I would use up some of my yarn this winter and contribute to our guild's kids' hats Salvation Army donation. So far, I've got two done. I'll share the pattern for the long stocking hat in case anyone is interested.

Made for charity 2-09-to fit 10 yrs and older.
Standard gauge
Yarn: Mary Lue’s Symphony/Solo -- teal, red, purple, turquoise, tan
Gauge: 7 st x 10 r = 1”
Finished size: At brim, 18” wide, 24” long with brim rolled up
Directions:
Mock rib - Cast on eon with waste yarn, knit a few rows, T 7, 130 N. One row ravel cord. Start with main yarn keeping to eon for mock rib. Knit 36 rows. Hang hem. OR do a regular hem on every needle, knit 36 rows and hang stitches. OR do regular ribbing. Put all N in work. Change to T 8 and add one stitch both sides. RC 000. Knit 20 rows in stripes x 4. RC 80. *Decrease every 6th stitch across, knit a row same color, take off on wy and rehang so there are no empty N. (Or, use garter bar.) Knit 20 rows new color.* Repeat from * to * until you have about 20 stitches left. Draw up on a long piece of yarn to be used for seaming. Remove waste yarn, run in ends. Mattress stitch the side seam. Make a tassle and attach to end.

I rolled the brim up, but it could stay down too. Uneven stripes or fairisle would make a dandy hat too.

Lazy wench that I am, I didn't photograph it but just stuck it under the scanner. So the picture above is kind of wimpy. The hat reminds me of stocking hats from many years ago. I think you could make it even longer and use the end to wrap around the neck as a scarf and hat all-in-one deal. Maybe I'll do that next and use up even more yarn!

Saturday, February 14, 2009

Happy Valentine's Day


I've been knitting more ski hats for a local high school, so there hasn't been a lot of knitting time for me. No silk painting lately either! I'm done with the hats for another year, so now I can play.

In honor of the day, I thought I'd offer you a pattern for a knit hot pad. It can be either hand or machine knit. I was knitting these up in all sorts of patterns a while back. They make nice stocking stuffers, especially if personalized. I did a lesson on how to design things in DesignaKnit for my machine knitting guild retreat and also included directions for them in a Beginner's Style File article for Knitwords a few years ago. I aimed for a 8 x 8 inch size, but size doesn't matter so much as long as they are utilitarian. You need to use cotton or wool because synthetics would likely melt. I put a layer of heat resistant material inside. I can't remember what it's called, but you can purchase it at any sewing/fabric store. I did designs that were personalized, for different holidays and occasions, some with funny sayings and even college logos. Easy to do in DesignaKnit. The floats are enclosed. You don't have to do anything to them and in fact they help with the insulation factor.

To copy the graph, click on the picture above so that you get a larger version. Then right click and save to your desktop and print from there.

Knitting directions: The pattern is 53 stitches by 137 rows. Use a mk tension or hk needle size appropriate for your yarn. Note: If knitting by machine, it's a good idea to have the end needles select so that you don't get a hole at the side of the end hearts. If knitting by hand, twist the yarns at the beginning of the first heart in each row. I have the DAK <.pat> file if you want it. Just write to me and I'll email it to you. After knitting the piece and binding off, fold in half with right sides together. Cut a piece of insulating fabric making it 1/16" smaller all around and place it on top of the knitted piece. Pin everything together. Seam through all layers with a sewing machine (a very small seam allowance), leaving one side open for turning and turn right side out. Slip stitch the final edge together by hand with matching yarn. You can make a small I cord so that it looks like a typical hot pad and include it in the seam, or just skip it.

I have made some out of wool and felted them, but they get kind of thick and unruly. Also, most of the time when you felt something with longish floats, you get some funny puckering.

It's kind of a fun and mindless project. Sometimes a person needs something like that, ya know?

Hope you have a lovely day!

Wednesday, February 4, 2009

More silk scarves...a few triumphs, a lot of blunders


I'm trying out some new (to me) techniques. The first is done using Pebeo black and bronze (which you can't see very well) water soluble gutta. Not too happy with the black, because I think I snipped off the tip too far down, making the hole too large, causing the lines to be too thick. Always something with being a newbie. The butterflies are a little overwhelming, even though I adore the colors.

On the second scarf, I had a lot of fun because it wasn't so taxing. Just blobs of color, let them spread, put a teaspoon of salt in the centers. Easily entertained, I was fascinated by the salt as it both repelled and attracted the color, ending up looking like real flower centers and adding texture. Then I painted the whole thing with Jaquard no flow, I think it's called, so that I could outline the flowers with black and not have the ink spread. Then finally I ironed it to set the dyes and washed it in Synthrapol.

Just like when you photograph knits, the items look lots better in person.

Here is a closeup of the salt effect.

I think you also need that touchability to appreciate.


Still having fun, but I REALLY need to get back to my knitting machines.