machine knitting midgauge standard bulky machknit knit machine-knit patterns

Showing posts with label midgauge. Show all posts

Monday, December 12, 2022

Patchwork Satchel ©marheck2022

 On a roll now.  A felting project for you.

This purse/tote/satchel is easy to make and is sturdy.  It can be knit on any gauge machine, but a midgauge or bulky machine is preferable; a midgauge was used for the sample.

In selecting yarns, be sure the yarns are 100% wool, not superwash or treated to be washable and dryable.  It’s best to use the same brand for all of the colors.  Even so, the colors will likely felt at
different rates.


I chose saturated colors that are considered to be “jewel tones”.  You may prefer earth tones or pastels.  It’s a good idea to put the colors together and study them a bit, perhaps removing some and adding others as you study the composition.  You could also knit with just two colors for a checkerboard effect.

The purse is constructed so that you attach pieces as you knit.  This eliminates seams. 

This is a good project to use up small amounts of yarn in your stash.

The knitting level is approximately at an advanced beginner level.  Some sewing skills are required.

I lined the bag for extra body, but this is optional.


MACHINE   Pattern is written for the midgauge but a bulky machine would work as well since the science of felting is not so exact anyway .

YARN  I used Paton’s Merino wool-  a medium worsted weight.  I used small amounts of 16 different colors, 2 skeins of the colors used for the hems and straps.  You could successfully use less colors and place them randomly.  If you are using up yarn from your stash, improvise as far as how much of any one color to use.   You can also use a thinner yarn and double it to approximate the medium worsted weight, but do this throughout, not for just selected patches.

GAUGE  Before felting, 4 stitches and 5 rows = 1 inch. 

FINISHED SIZE   14” high by 20 inches wide;  depending on how your yarn felts, it may vary some from this size.

OTHER MATERIALS  five ¾ inch beads for decoration and closure, ¾ yard coordinating lining material, small amount of interfacing for inner pocket, matching sewing thread, large- eyed sewing needle and sewing machine.

KNITTING NOTES

·        As stated above, this pattern provides directions for a midgauge machine.  You can modify for the machine you are using.  That is, if using a bulky, you could multiply stitches and rows by 80% or so, or knit it the same as the directions for a slightly larger bag. If using a standard gauge machine, I would multiply the stitches and rows x 140%.  Always use the highest tension (loosest) for best felting, regardless of which machine you are using.

·        It’s a good idea to do a tension swatch to see what you need to do for each patch. You may want to adjust the size of the squares.  I was aiming for square patches, but mine came out a little on the rectangular side.  Even though I did do a swatch, the knitting tends to shrink more in length than it does in width.   If you’re ok with this, follow the directions as written.  If you want squares, add a few rows to each patch to compensate for the extra shrinkage in length.

·       Examine the edge of the knitting.  You want to be able to identify the loops.  The knitting will have a loop and on top of that a knot.  You will hang the loops to attach one strip or piece to the next.

·       It’s not a bad idea to draw yourself a chart on paper and decide color placement ahead of time.


DIRECTIONS

Straps       Knit 2 the same

T 10.(loosest throughout) Ewrap 18 needles, knit 120 rows.  Bind off loosely.  (This size makes a comfortable shoulder strap.)  Fold in half and stitch shut with a mattress stitch.  Two layers makes it stronger.


Patchwork strips to make the rectangular sides  - Make two sides 

Strip one:  Cast on with waste yarn over 20 stitches, T 10. and knit a few rows.  RC 000. With main yarn, E wrap on and knit to RC 24.  Drop color one and knit 24 rows of color two.  Drop color two and knit 24 rows of color three.  Drop color three and knit 24 rows of color four.  (RC 96)  Take strip off on a few rows of waste yarn.  Tie yarn ends together so they don’t unravel.


Strip two:  Cast on with waste yarn over 20 stitches, T 10. and knit a few rows.  RC 000.  Ewrap on with main yarn.  With the wrong side of strip #one facing you, hang the first loop on the left needle.   With new color main yarn, knit 2 rows.  Pick up the next loop from the completed strip, hang it on the left most needle, knit 2 rows.  When you have reached 24 rows of the new patch, change colors and proceed in the same manner until you reach the top and have added 4 patches.  (RC 96)  Take off on a few rows of waste yarn. Try to make the colors come out so that they line up across from each other.  Fudge if you have to, but if you are picking up loops, not knots, it should come out right.

Strips three and four:  Knit in the same manner as you did strip two.

Tie yarn ends together so they don’t unravel.

Make the second rectangle the same as the first. Hide yarn ends.  Remove waste yarn from the bottom of the bag.


SIDE GUSSETS

These are knit while hanging the bottoms and sides at the same time.  (See drawing below.)


Cast on with waste yarn over 24 stitches, knit a few rows T 10.  Change to main yarn, knit one row.  ( I knit the bottom of the gusset in one color and the sides of the gussets in a second color, but you can use just one color.)

With the wrong side of rectangle #one facing you, find the exact center of the bottom and hang that stitch on the leftmost needle.  With the wrong side of rectangle #two facing you, find the exact center of the bottom and hang that stitch on the rightmost needle.  Knit two rows.  When you get to the corner, knit 3 rows before hanging rectangle stitches.  (This helps the gusset go more smoothly around the corner.)  Check frequently that you are in the same place on both sides.  If you get off track, it’s best to redo or the bag will bias.  When you have knit the gusset and joined all the way to the top, take off on waste yarn.  Turn the piece around, pick up the bottom stitches from the waste yarn and knit in the other direction.  Difficult to explain, but it’s not hard to do.  When done knitting the second gusset, remove waste yarn.


TOP HEM

You should have 100 stitches on each side of the bag --- 80 from the rectangle, 10 for half of the gusset on both sides.  Hang  one half of the bag stitches, wrong side facing you, decreasing evenly across to 80 stitches.  With main yarn, knit 13 rows.  Pick up and hang first row to make hem.  Knit one row by hand left to right and bind off loosely. Repeat for the other side of the bag.


I CORDS


Side ties:  Set machine to slip one way, knit the other to make I cords.  Knit a 4 stitch I cord, changing colors as desired to RC 220. Bind off by placing the outer stitches on the center stitch and binding off the two remaining stitches. Make two the same.

Front closure:  Knit one four stitch I cord 80 rows long.  Bind off  as above.

Short I cord decorations:  With the wrong side of one side facing you, fold down the hem toward you.  Pick up 3 stitches from the right side, 2 ½ inches from the edge and immediately under the hem.  Set machine to slip one way, knit the other to make 3 stitch I cords.  Knit 40 rows.  Bind off as above to one stitch.  Repeat across the bag, staggering the I cords every 4 stitches or so and changing colors and lengths at random.  My I cords were 20, 30, 40 and 50 rows long using all the colors in the bag, one to each I cord.  Leave a 2 ½ inch space when you reach the end.  With a large-eyed embroidery needle, hide yarn ends by sewing up into the tube and snipping.

Repeat on the other side of the bag.


FINISHING

Sew the two sides together at the top hem with a mattress stitch, both sides.  Felt the purse, I cord side ties, front closure I cord and straps at the same time in the washing machine.  Hot/cold cycle with a small amount of detergent and a few other smooth pieces of clothing.  (No towels.)  Stick around to watch the progress.  Repeat cycle if necessary.  When felted to your satisfaction, stuff the satchel with scrunched up plastic bags and lay flat to dry.


Pinch the sides together at the top and with a large knitting needle (at least size 10) poke a hole through all 4 layers.  Thread the I cord side ties through these holes and tie a knot close to the purse.  This cinches in the purse at the top.  String a bead onto the end of each side I cord and tie a knot to hold in place.  Repeat for other side. If you don't cinch in the sides, the top is too wide open. 

With a sewing machine, sew straps to purse about 3 inches in from each side.   Sew a few times for strength. Fold the front closure I cord in half and sew the two ends to the top middle of one side, on the inside.  Sew a bead onto the purse, measuring  where it should be. 


Slip over the bead for measurement and sew together just above the bead with sewing thread so that the top stays closed.

LINING

Lay the bag on a piece of paper for a pattern and trace around it leaving room for 5/8” seams on all sides and a 2” hem on the top.  Cut out two layers of your lining with this pattern.

For pockets, cut two rectangles about 10” wide x 8” long out of the lining material and same out of interfacing.  With right sides of the lining material together and the interfacing on top, sew around 3 sides.  Turn right side out.  Stitch down the pocket to one side of the lining about two inches down from the top and  in the middle.  Sew vertical lines to divide the pocket for pens, cell phones, etc.  Embroider initials on the other side of the lining.  With right sides together, sew around the lining, leaving the top open.  Push into the felted bag, tacking the bottom of the bag to the bottom of the lining in a few places on the inside.  Fold under the top hem to cover up the machine stitching.  Hand sew with tiny stitches and doubled thread. 


I hope you enjoy this project. It certainly will be unique to you.

Wednesday, March 10, 2021

Cotton Pullover for Grandson

Finally got over my funk a little bit and did some knitting.  Never contracted the carona virus and did get both of my Pfizer vaccinations.  Dont' know what has been the problem.  Hope to shape up and knit and post some more stuff.  As always the picture doesn't do it justice.  Really does look better in person. Weird dark shadowy rainy day today affecting the photo.  The armhole decreases really are the same.

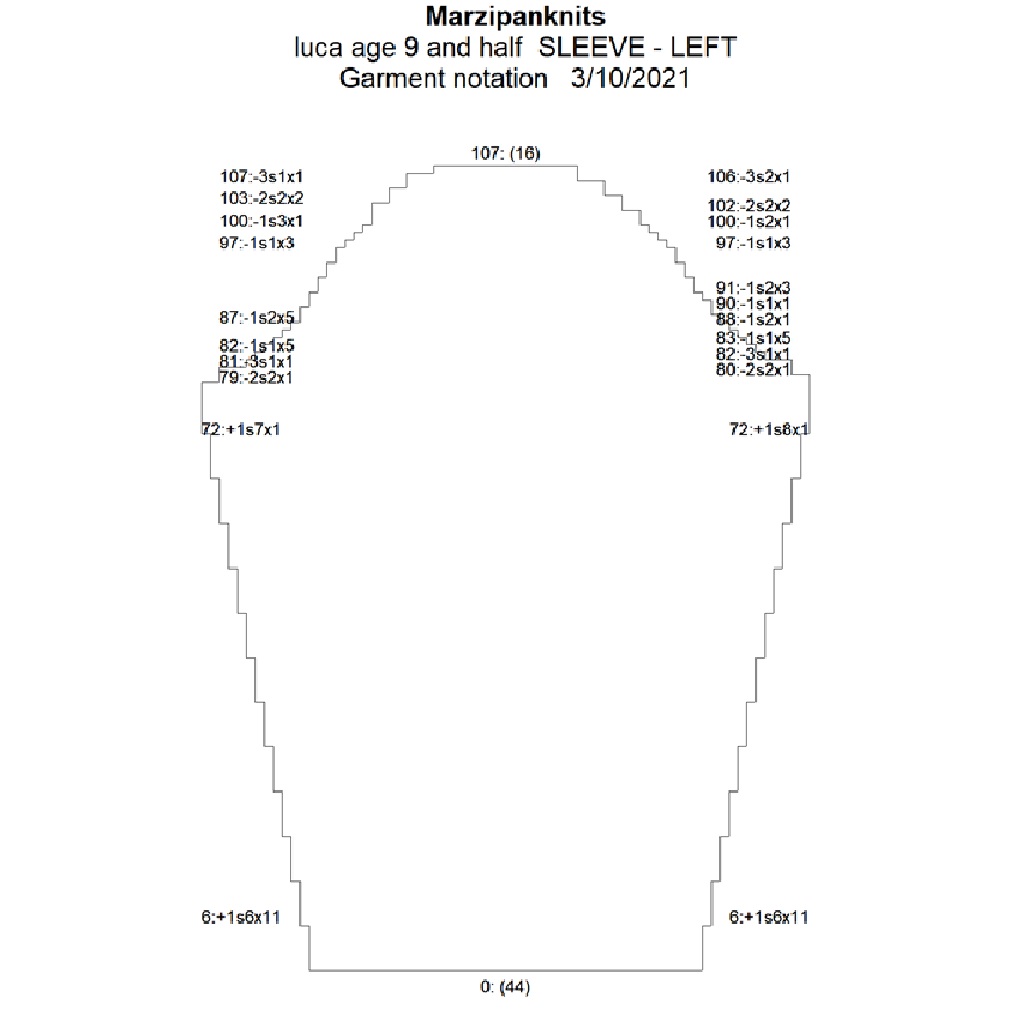
Just in case you have a 8-9-10 year old to knit for, here is a pattern  you could use. Write to me if you can use the Designaknit file and I'll email it to you.  Otherwise, you can follow the directions below.

Pullover for Luca age 9


Midgauge (SR 860 + ribber)

 by Mar Heck  3-9-21

Notes:

*  Used Conshohocken cotton yarn---has a core that is roving-like with a stronger thread wrapped around.  Shrinks terribly so I knit two gigantic rectangles, guessed that it would be enough yarn to knit the sweater, washed in hot water and dried in dryer.  Then re-wound onto cones.  Should be sufficiently pre-shrunk.  Had to clean a lot of fluff out of the dryer!!! It’s really soft, one positive thing to say about it.

* Sweater is a size 10 as measured by store-bought boys’ sweater.

* Gauge for main pieces is 5 st and 6 rows to one inch at T6

* T 3/3 for ribbing. 

^sleeves 22 rows

^ front and back bottom ribbing 8 rows

^ neck 10 rows

Transferred rib stitches to main bed and knit right to left with one row T 8 for loop through loop bind off.


* DAK shape file is for the pieces not including ribbing.


* Start with waste yarn and ravel cord for all 4 pieces.  When done, turn the piece upside down and do the ribbing.  Bind off for the cotton yarn was nicer than the cast on.  First used a bind off around the gate pegs and it flared too much.  Loop through loop looks better.


*  Neck is big because L wants to wear a cotton T shirt underneath and doesn’t like tight necks.  Can be adjusted.


* Neck was done with FF decreases one side at a time rather than short rowing.  First time doing neck this way and I like it.  Easier to do with this machine than short rowing.  Needles kept popping into work when short rowing, frustrating the heck out of me.  Blue air.  Maybe need a new sponge bar???????


* This yarn is hard to work with since it has NO stretch.  Next time will use an easier-to-work- with yarn.


Now….what to do with all this extra pre-shrunk yarn?????


Sorry the numbers are a bit blurry.  I can't seem to copy them so they show up well.

Friday, January 10, 2020

Baby, it's cold outside. Need some footies??


Midgauge Slipper Footies

Knitting Notes and tips:
These are knit on the main bed only, on any midgauge or bulky machine.  Yes, I hid the seam that goes up the side of the instep in the picture, but honestly the seam is not bothersome.   I used two strands of Jaegerspun acrylic yarn which was labeled 3/8.     Use any yarn that achieves the tension indicated in the pattern.  It seems you have to do a bit of experimentation to fit a specific person in which case you'd need to change the stitches and rows. If you are knitting these for charity, they will fit someone.  One strand of navy and one of black made the slipper appear to be knit from variegated yarn.  I strung them through their own eyelets and joined them at the carriage.  To prevent a hole forming on the heel, take the purl bump of the adjacent stitch at the inside of the end of short rowing and exchange it with the adjacent needle. Also try exchanging the stitches to see if you like the look of this better.   
 Because of the rolled hem, it is best to use the stockinette side as the right side.  If you don’t like the rolled hem, you could knit rib either by hand or knit the cuff by latching up the stitches, then proceed with the pattern. Or, if you have a machine with a ribber, have at it.  Since these work up so fast, they’d be a good project for Operation Toasty Toes or other charity that takes slippers.   If you are knitting these with cotton, it’s really important to swatch and wash since cotton is notorious for shrinking.  Call me weird, but I like to knit a big rectangle, wash it and put it in the dryer, then rewind the yarn.  That way it is preshrunk and the gauge is pretty much accurate.

Machine:  Any midgauge; bulky would work achieving the same gauge
Yarn: Any yarn to achieve the same tension if you want to follow the pattern. I used yarn that was slightly thinner than sport and doubled it.  Do a swatch with your chosen yarn to get the same gauge.
Tension:  at T 5, 4 st x 7 rows = 1” with yarn doubled
Finished size of large = man’s shoe size 10-11 
 Sizes medium and (large).  If one number, it applies to both sizes.  You’ll have to experiment if the first try doesn’t fit.
Directions:
With waste yarn, cast on over 46 (48) N, knit a few rows, one row ravel cord.  With main yarn ewrap on, leaving a 12” tail for seaming.  Knit at T 3 for 12 R for roll hem.  Change to T 5 Knit 8 rows (7 rows for second footie to end on left side of bed).  Note:  if you want these to rise higher on the ankle, knit more rows here.
Heel – Set carriage to hold position.  Pull all needles left of zero to hold.  Short row down to 8 working needles by pulling the working N closest to the carriage to hold before each row. Reverse short row by putting the needle opposite the carriage into working position, knit the row, until all N are in work again.  Remember to close up the hole before you begin doing the reverse short rowing.
Put carriage on N. All needles knit.
Foot-  RC 000.  Knit 42 (48) rows. (Use an odd number to end up at the left side for the second footie’s heel.)
Toe – Knit exactly as you did the heel.   (Another option is to do ff decreases for the toe.  Some people like the look of this better.)
Knit one row overall with main yarn and then remove on several rows of waste yarn.  
Fold the waste yarn back and kitchener stitch the toe seam.  I find it is easier to graft from the purl side.  Remove waste yarn.  Do a flat seam for the side. Hide yarn tails.  Knit the second footie putting the heel and toe on the other side of the bed. 


Using the same basic design, you can make women’s footies.  You’ll need to experiment to find out how many stitches and rows to do.  My stitches and rows for a size 6 shoe with  Bernat Baby Boucle was 6 st and 8 rows to 1”  I cast on 42 stitches, did 10 rows for the hem and did 38 rows for the foot.   I’m not even sure this yarn is made anymore so you will really have to calculate your own with your chosen yarn! 
The fluffiness of the boucle made it ideal to use the purl side as the right side.  When you do this it totally hides seams so that the slipper looks like it is knit in the round.  The only difference from the above pattern is that, rather than making a rolled hem, this hem is hung from the first row.  You would begin with waste yarn, knit a few rows, then change to main yarn and knit the number of rows you want for the depth of the hem x 2.  (Don’t do a permanent cast on with the main yarn, just knit.) To make the hem, pick up the first row and hang it on top of the stitches in work.  It naturally rolls to the outside.  On the picture you can see that the hem is stockinette on the outside but the body of the footie is purl stitches.
Be sure to write down your gauge, number of stitches to use, number of rows for the hem, rows for the foot and anything else.  I have been known to knit merrily away and forgot to write down the vital info so had to take a wild guess for slipper #2.  Sometimes successfully!  Sometimes not.
      

Saturday, November 30, 2019

Need a stocking stuffer? Knit some Fuzzy Feet Slippers


Fuzzy Feet  by Mar Heck ©2019

 This pattern is adapted from an easy, old, hand- knit slipper pattern that for years has been passed along from grandmother to grandchild and probably has been knit a million times.   Adding three twists to the pattern:  they are done on the machine in lightening quick fashion in stockinette stitch, we are adding fun fur to tickle our fancy and we are felting them to make them extra warm. MACHINE:   9 mm Bulky or midgauge 

SIZES:
   Child to adult.  Adult in parenthesis.

MATERIALS NEEDED:
  3 (4) skeins Lion Brand Fun Fur™ (60 yards per skein, polyester), purple used for the sample
  1 (2) skeins knitting worsted weight wool yarn (Do not use wool yarn made to resist
   felting,  called superwash.) Light blue used for the sample.   Large eyed needle for sewing up

SKILL LEVEL:
    Beginner.
         Skills needed:  Making a swatch and determining gauge
                                E wrap cast on.               
                                Mattress stitch for hand sewing.


DIRECTIONS:

1.  Determine the recipient’s foot size by taking two measurements.  Measure the foot length from heel to toe and then measure around the instep close to the ankle.  The foot length will be the finished slipper length (number of rows)  and the width will be how high the slipper comes up each side of the foot on the sides of the heel/ankle (number of stitches).  The slipper is just a plain rectangle.

2.  Make a swatch .  You will make the slipper the size of the felted gauge. With one strand of fun fur and one strand of the wool held together, e wrap cast on 20 stitches and knit 30 rows at the largest tension your machine will do.  End with waste yarn and remove from machine.  The waste yarn will tell you which direction is the rows.  If it felts really well, it’s hard to otherwise tell which direction is which.  It will feel like a big waste of yarn, but you’ll only have to do this once for a particular brand of wool.  (You might be able to later think of a use for this little swatch.)  Throw the swatch in the washing machine until the wool felts.  Depending on the yarn you choose it may take a few cycles for it to felt.  After it attains the look you want, measure the swatch to determine stitches and rows per inch or centimeters, whichever you are more comfortable with.   Multiply the stitches and rows per inch times the dimensions you want to determine how many stitches and rows you will knit for your rectangle.  (See note below for calculating.) Note that it will have shrunk more in length than in width.

***If you prefer not to make a swatch, for a rough reference:  using the largest tension, my child’s slipper turned out to be at T 10.. 44 stitches X 50 rows to fit an 7-8” foot.  My adult women’s slipper, about a size 9, turned out to be 50 stitches X 74 rows to fit a 9 -10 inch foot. Because felting is not an exact science, you’ll need to do a little experimenting with the yarn you choose.  If you use the same yarns for different sizes, you can knit a pair using your best guesses for stitches and rows then adjust for other sizes by adding or subtracting stitches and rows. This works fine if you would prefer not to waste yarn on a swatch.  (You can’t reuse yarn that’s been felted, so some people would prefer to just dive right in.)    Another thought: you will want the slipper to be a bit snug, so do not add any ease.

3.  Directions for knitting.  Knit one rectangle for each  slipper.

*  E wrap cast on loosely from left to right with one strand of each yarn held together over the number of needles  you have determined you need.  Leave a yarn tail at the beginning about 10” long to later sew up the heel seam.

*  Put the yarns together in the feeder and turn the dial to the largest tension number.  Set your row counter to zero and knit one row from right to left.  (May be a bit hard to push the carriage.)

*  Hook the cast on comb into the stitches.  Add as much weight across the knitting as you can. Use ribber weights if you have them.  For the first 2-3 rows, pull all needles out to E position each row to make the stitches knit off a little easier.  Yank the knitting down after each row so that the fur doesn’t get hung up on the gate pegs.  Knit the number of rows you have determined you need.

*  End with the carriage on the right side.  Take the yarn out of the feeder and cut a length of the two yarns about 1 ½ feet long which will be used for sewing up the top of the slipper. ( I sewed mine first then felted them. ) Thread both strands into a large eyed  needle and take the stitches off their needles, one at a time from right to left onto this thread.  When all stitches are off the machine, pull the stitches as tight as you can.  This will be the toe.  You will most likely have a little hole, so stitch across the hole from north to south and east to west a few times.  Neatness doesn’t count because the felting and the fur will hide your sewing.

* Don’t break yarn.  With this same length of yarn, sew up the top of the foot seam with a mattress stitch from the toe towards the back of the slipper.  Again, for reference, I sewed a 3 inch seam for the child’s slipper and a 4 inch seam for the adult.  Fasten off by sewing through your last stitch again and then hide the yarn tail inside the slipper by sewing through the backs of 5-6 stitches and cutting the yarn off.   You need a large enough opening to slip the foot into, but small enough to stay on snugly.

*   Thread both strands of your beginning yarn tail into a large eyed needle and sew up the heel seam. You will be folding the back of the slipper in half and sewing from top to bottom.  The stitches face each other, so you can’t do a mattress stitch.  Any seam will do. Sew twice for strength.  Hide the yarn tail as above.

*  Note:  the edge that ends up around the ankle needs no treatment.  When felted it lies perfectly flat.  No problem there!

4.  Felt both slippers at the same time in the same wash load(s) giving them the same treatment as you did your swatch.  My wool needed 3 hot/cold cycles to felt, but each yarn brand seems to behave differently as do different colors, so you just need to monitor it.  When felted to the size you need, scrunch up some plastic bags, stuff the slippers so they have a nice shape and let them dry for a day or so.  Petting them doesn’t prolong the drying period, so have at it.  It’s amazing how the wool pulls together and makes the non-felting polyester “fur” more dense.  People are kind of surprised you can do this on a machine.  Just one bit of warning, they’re slippery on smooth floors.

5.  I found this addictive and made several pairs. They are so soft and cozy! For your next pair, you can do stripes and/or embellish them with bows, eyes, ears, tails, whatever.  Baby booties would be really cute and easy.  Because of the slippery nature of the slippers  (is that how the word came about?), the pattern may not be appropriate for toddlers or older folk.  You decide.  Once you have your gauge, the next pair is a snap. They are so silly, they’re fun!

New Knitter Notes:

Ewrap Cast On:
Pull needles that are going to be in work out to E position.  Make a slip knot and hang it on first needle on the left.  Push the knot back to the needle bed.  Just as though you were writing a cursive “e”, wrap the yarn around each needle counter clockwise, from left to right up against the bed, not in the hooks of the needles.  Easy does it---don’t wrap too tightly.  No need to wrap the last needle on the right.  Just put the yarn in the yarn feeder and that stitch will knit automatically as you push the carriage from right to left.  After your first row, hang the cast-on comb.

One way to calculate the stitches and rows per inch:
This simple method works in this case since we are dealing in approximations anyway.  For a sweater, you would want to do a more extensive swatch.  In this example, you knit 20 stitches and 30 rows and then felt your swatch.  When it has felted to your liking, measure the width.  Say your swatch, after felting, measures 4 inches across.  20 stitches divided by 4 inches = 5 stitches per inch.  To get your number of stitches for the width of the slipper, multiply 5 times the number of inches you want.  Say the length ended up to be 5 inches.  30 rows divided by 5 inches = 6 rows per inch.  To get the number of rows for the length of the slipper, multiply 6 times the number of inches you want.

Hand sewing a mattress stitch: 
Have the right sides of both pieces facing you, side by side.  With your large needle, go under two bars on the right side of the first stitch of the piece on the right, then under two bars on the left side of the first stitch on the left piece.  Go back and forth repeating from side to side, pulling the yarn taut now and then.  The stitches from each side pull together making the seam invisible from the right side.


Tuesday, November 26, 2019

Christine Linfeld’s shawl as a poncho


ridelikethewind’s PONCHO
Check out her poncho on Ravelry in her projects.  Hers is much prettier than mine, I'm afraid.  She used worsted weight yarn on a midgauge so her gauge is larger than mine, that is less stitches and rows. She was inspired by Bill King's waterfall sweater. She kindly helped me get my head around the construction and once I caught on, it was easy and went fast,

I used mohair from Cindy Schmatz when she had a yarn sale.  I used about 10- 50 gr hand knitting skeins I think…   Wound onto cones.  Unfortunately, I lost track!  Used my  LK 150 at T 4.


There are eyelets down center front and center back only, not also over the shoulders as in the original Christine Linfeld’s shawl. Also, the original shawl has 4 points.  This has two: one in front and one in back.

Overview of construction:


Start with waste yarn several rows and 1 row ravel cord over (110) needles.  On last row of waste yarn, transfer to the needle setup of lllxlllx….  Add extra stitches at each side which will be neck and bottom edges.
 Start with straight section and knit (72) rows. CAR.

Begin short rows: Set machine to hold. At the opposite side of the carriage, Hold 3 needles, knit 4 rows.  At the same time, short row at the neck (left side) 3 additional stitches and wrap end n every 8 rows.  (didn’t do enough the first time see note at end)
Finish short rowing:  Opposite the carriage put 3 N in work, knit 4 rows until all N are in work.

Straight section: Knit the same number of rows as you did the first time.  Front (or back) completed.


Repeat the whole thing for the other side of the poncho.


End with one row of ravel cord and  then several rows of waste yarn. You will be joining at one shoulder.  Kitchener stitch the seam.  It’s kind of awkward kitchener stitching because of the needle out of work loop.  Try to stitch 3 st to three st so it looks continuous but lies flat.  Truly it takes much longer to seam this than it did to knit it,  Run in any yarn tails.


Additional comments:  I recommend using a highly contrasting waste yarn color to help you find the stitches for kitchenering.  I have put my measurements in parenthesis because you will want to use your own number of stitches, hence rows.  I am rather fluffy these days so mine is XL, which is comfy for a poncho for me.  Because I didn't short row the neck enough, the neck turned out huge!  She ended up with 22 ridges, I have 27.
 Attempt to tighten neck because I didn't want to rip out the whole thing!!!:
3.25 crochet hook, yarn DOUBLED.  Chain stitch (not sc) around starting at shoulder picking up every other knit stitch x 9 then skip 2 knit st for the 10th  chainstitch. Row 2 chain in each chain st.


Mine ended up with these measurements:


32" seems like a lot for the neck, but it really isn't.  I prefer to not have clothing tight around the neck.  This sits nicely on the shoulders.  The neck doesn’t look so puffy when worn so I’m not that unhappy about it.  Next time:  short row  # ????  Will need to experiment.  Did leave the bottom edge alone even though it curls a little.


Close up of eyelets:


 Red is super hard to photograph, especially with this cheap phone camera of mine. Plus the halo of the mohair doesn't show. As always looks much nicer in person.  I hope you have a good imagination because this pattern really is a gem.  I think it will be good to wear this in spring and fall and also in the house when temps are below zero outside. 


Tuesday, September 18, 2018

COTTON CHILD'S HOODIE

  I just finished this cotton hoodie for my grandson's 7th birthday which is in October. I'm lucky enough to be able to fly to CA to help him celebrate.  Can't believe how fast these 7 years have flown by.  I almost wish he would not get any older, but I realize that's a bad wish.
  I've had some cones of Conshohocken cotton on hand for a long time.  It's nice yarn, but I knit a sweater for a nephew out of it  before and it shrank terribly.  So this time, I knit a giant rectangle, abused it as much as possible in the washer and dryer to pre-shrink it.  Because it's a cotton core with some other fiber wrapped around it, not plied, a lot of the cotton came off in the dryer. Was still nice though, soft and fluffy. No problems rewinding it.
  I used DAK to come up with a pattern for the midgauge LK 150.  I don't know about you, but I have a hard time judging what the sizes for kids are in DAK.  Have to find measurements for the typical American kid and try to match it up with DAK.  Nothing really matches but I think I got close to a size 8.  It's a tad big and he's a skinny kid, but he'll grow into it. Did a dropped shoulder in standard garment styling then took it into pattern drafting to make adjustments.  Made a hood, a placket for the front and changed the armhole shaping a la Elizabeth Zimmerman.
  The placket turned out really nice, although the picture doesn't do it justice. 
 
  Some take-aways you might get out of this are as follows.  First, I made the armhole shapings of the front and back larger. Instead of binding off 5 stitches, I bound off 9.  That's the Elizabeth Zimmerman thing as in her Tomten jacket, if you are familiar with that pattern.  This helps reduce the bulk in the underarm and shoulder. This 1 1/2 inches were then added to the sleeve length. 
  For the cord that goes through the front of the hood, I cast on 5 stitches and just knit the length to go around the face and enough to hang down each side.  I used to always knit an I cord, but this goes twice as fast and looks just as nice as an I cord because the edges automatically curl in on themselves.
  My hems are different than I usually do.  I started all pieces with waste yarn and started right in with the main yarn.  To make the hems, I crochet cast on over the number of needles in the piece minus a few stitches.  Then I pushed these stitches back and hung the bottom of the piece into the hooks of the needles, wrong side facing and doubling up as needed.  Using a straight edge (the mean cast on comb) I pushed the hung stitches through the crocheted ones.  You know they are through ok when you hear a little popping noise.  Knit the first half of the hem at garment tension.  Then I tightened the tension one whole number for the second half of the hem minus one row, hung the first hem stitches, hand knit one really loose row and did a loop through loop bind off.  The hem lies wonderfully flat and the crochet cast on makes a nice decorative line on the front of the garment.
  The other thing I did was make  a little vent on each side of the body.  It was easy in that I just stopped hemming when I got to the doubled hem and hand stitched the sides of the vent closed.
  I thought this sweater took longer than usual, but it was because I had a gazillion yarn ends to work in. 
  The pictures don't show details very well because of the design of the yarn, but the design of the yarn also hides any irregularities that might be present.  Irregularities ?  Me? no way.
  You know how lots of times your knitting doesn't come out exactly as you would have liked?  This time, which is actually rare for me, I had no "regrets" and wouldn't have done anything differently. 
  I also knit a saddle shoulder sweater for him as practice for a class another woman and I are teaching to my guild.  I couldn't bear to part with the swatch, so I made a doggie sweater out of it to match.  Once I take some pictures, I'll do another blog post.
Happy knitting!