Saturday, March 27, 2010

One cone gone!


Finally, I used up one cone of gray mystery yarn. This is how much I had left. Not even enough to get across the row. It stretched unbelievably far. You can see how skinny the yarn is. Lots of swatches, four 6+ foot scarves, one ring in a circle scarf and two hats. The hats and scarves are for charity. The mottled items are the gray mixed with another mystery egg shell colored yarn. Another giant cone I got I know not where. I didn't twist them like a person probably should, just ran them up through separate yarn feeders. Kind of cool I think, the randomness. Good feeling to use up yarn, but there are so many cones to go! My goal is to have just enough yarn to fill one yarn tree and no more. Have a lot of plastic bins to attend to still. Stay tuned!

OOps! Almost forgot to update my yards knit. Let's see. 1 yard x 604 rows = 604 for the scarf. 1 yard x 136 rows x 2 hats = 272 yards. Together: 876 yards. Not bad.

Monday, March 22, 2010

Ah...the sweet mysteries of machine knitting

I really hate to admit it when something (knitting-wise) seems to be defeating me. I'm referring to Diana's Zig Zag Scarf.

http://diananatters.blogspot.com/2010/03/new-video-today-zigzag-racked-ribber.html

I was determined to make it. Wrote down the instructions while watching her video, made my own spread sheet---just like hers. The pattern, or something, didn't like my machine and my machine didn't like the pattern. At first I thought it was static, then I zigged when I was supposed to zag (see picture), then I thought my machine needed oiling and I tried about 12 different yarns and tensions. The picture below is actually the best of my disasters. The question mark indicates "What was I thinking?" The result is interesting, but not interesting enough to keep, if you know what I mean. Hmmm...maybe in the future I could go twice as many rows in one direction. But a person really should get the original pattern correct before going off on a tangent. Had a friend check out my directions to see if I was doing it right. I thought that this shouldn't be so hard. I felt like I was having a heart attack trying to move the carriage back and forth. I knew there would be no way I could do 600+ rows. And, Diana didn't seem to be having any trouble pushing the carriage in her demo. Not having any joy with anything I tried, I knit a few other things in the interim to check to make sure my machine really was ok.

Finally, I broke down and wrote to Diana and asked if she had any suggestions. I was kind of embarrassed because it's not exactly like I'm a novice knitter. She was most gracious and even said she loved a puzzle! She confirmed that I was racking in the correct sequence, so that was the main thing. I was apologetic about wasting her time, but she was non-plussed about it. What a sweet person!!! She's as nice as she sounds in her videos.

Yesterday then, after getting confirmation from the expert that it should be working, I thought I would try ONE MORE YARN. Finally, it worked. It's a beautiful pattern. Then the phone rang, I ran to answer it, came back, checked my cheat sheet and off I went again only to find out A FOOT LATER that I zagged when I was supposed to zig. O well, I found a yarn and a tension that my machine would cooperate with. This is my "good" swatch. (Not showing you my wrong turn...) For now, this was enough.

Don't let my experience discourage you. You probably will fly right through it.

The question for me remains, will I have the concentration to stick with it again and not make any mistakes for 6 long feet? There really is NO room for error. It's frustrating to not be able to see what you're doing until way past the point where an error may have occurred. And, there's no way I could rip back and find the right spot in the pattern. I have a knitting friend who probably could, (hi Ellen), but not me. This is one of those all or nothing deals. Do I get to count on my knit meter the 1,000 yards of yarn I used trying to get this right???? (I guess not.) And, finally, what the heck was I doing wrong on the previous 12 or so swatches? I'm suspecting tension, but don't know for absolute sure. I guess it will have to remain a mystery.

Saturday, March 20, 2010

Sometimes I get the urge...

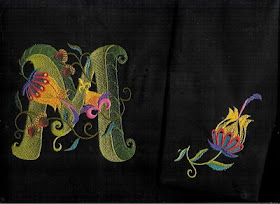
to use my embroidery machine and make something. I suppose this title will put me at risk for search engines looking for porn. Won't they be disappointed! I have a tote bag that needs embellishing. Got this gorgeous pattern from the Embroidery Library. It's called, simply, "Garden Alphabet". There are two designs, one for the front of the bag and one for the back. Because the fabric is black, it's hard to see that it is indeed two pieces of fabric. The M is 5" tall and the single bud is about 3". I'll top stitch the squares on while the bag is opened at the seams. And then I'll add a lining with some handy pockets. That will be tomorrow's project.

I'm amazed at the artistic talent that goes into creating these embroidery designs. I think they are really yummy, even more beautiful in person.

Friday, March 19, 2010

Repurposing an old Norwegian Sweater

I knit this sweater a couple of years ago. I think the pattern is from Poetry in Stitches, by Solveig Hisdal. OR, it's a Dale of Norway sweater. I can't remember. I chose colors that were kind of "in your face" and didn't like them after all was said and done. The yarn was really expensive, though, so it has been one of those guilty little things sitting in my closet. So, yesterday I decided to chop it up and make some useful things out of it.

First, I used one cuff to make a hat for the American Girl doll. I just cut it off, unraveled a few rows to get the stitches all in a line, used the unraveled thread to sew up and gather, seam the side. Voila' it fits her perfectly.

Then I threw the sweater into the washing machine with some jeans to felt/full it. There were some long floats on the back side that I had hung up on the needles to make them shorter. During the felting process, the floats shrank and the fabric puckered a little. So, I just snipped them on the back side and was able to press out the knitting fairly smoothly. Hub and I have gotten into drinking tea again, so I thought it would be nice to have a tea cozy. This is the result. The handle of our hand thrown tea pot doesn't fold down, so it looks kind of crazy tall, but it works fine.

Finally, I made some pretty mitts for myself for next winter. I just traced my hand on a piece of paper and made a pattern that way. I was able to use the hem of the sweater as the cuff of the mitt. The insides were kind of messy, so I lined them with some cute fabric.

You might ask why I didn't center the flower on the back of the mitt. It was simply because I couldn't get two pieces of fabric wide enough if I centered. So, whatever. The embroidered flowers offset it a bit.

Guilt assuaged a little bit. I still have some sweater left. Will try to think of more things before the last of it gets tossed. The pewter buttons will be saved and used again, of course.

Tuesday, March 16, 2010

Fisherman's Rib Charity Scarf


The fisherman's rib stitch pattern is created by tucking on both beds on alternate rows. Both sides of the fabric look the same. Two strands of very thin yarn, lace weight(?- mystery yarn), threaded separately and joined at the carriage. They are two different shades of gray so makes a heathered look. Lots of weights used plus “7 wires” at both sides moved up every 30 rows. Circ cast on 70 stitches, T 0/0. Set to FishR: Left tuck on main carriage, right two levers up on rib carriage. T4/4, 700 rows. One row loosest T, transfer to mb, chain off. Finished size is 8” wide x 50” long. Soft and squishy, edges behave themselves. Nice and plain for a guy, I'm thinking.
That makes 4 long scarves with this cone of gray and probably can get 5 more out of it!!!

Monday, March 15, 2010

Going around in circles with a knitting machine


Another attempt at using up the yarn stash. Another gal (Vonkad on Ravelry) and I got inspired by seeing pictures of circle scarves at the same time. She is in the process of writing up her version. I think she is being a lot more precise than I was. I jumped in without a lot of thought and just went for it. Not sure yet how she joins her circles, but I just attached the previous circle every other row 5 times as I was knitting the next. Looking back, I'm thinking it isn't necessary to join them at all. The join is at the back of the neck and doesn't show anyway. Plus---a person could knit a variety of yarns and colors and mix and match circles to work with an outfit.

The scarves are squished under the lid of my scanner, so the pictures are not so elegant. You can see, though, that the strips just roll inward with the stockinette side turning out to be the public side. Advantages over knitting I cords are that it goes much more quickly and you can make the widths of your circles much wider.

This was seriously fun, mindless knitting! I cast on with waste yarn anywhere from 10 to 20 stitches, depending on the yarn and machine, and knit anywhere from 200 to 400 rows. Knit a few rows of waste yarn to start so it wouldn't unravel. Then changed to main yarn and knit the length I wanted it. Yup, against all the holy principles of machine knitting, I measured whilst on the machine. When I thought it was long enough I took it off on several rows of waste yarn. I kitchener stitched the ends together while it was in my lap and removed the waste yarn. Some of the circles were long enough to wrap twice around my neck. I tried to stagger the lengths. Random is good sometimes.

The red one has seven different yarns: cotton, wool, silk, slubby. Most of the strands were knit on the standard gauge. The colorful novelty yarn would only knit every other needle on the bulky. (Big and fat.) It resisted, but complied in the end. The gray/black/white/tan one has six circles with a variety of fiber contents also. It is fun to try to find a variety of coordinating yarns in the stash and use them up!!! Can't imagine knitting one of these by hand, but it's a perfect project for the machine. And, there aren't a lot of projects where you can mix and match machines, giving each their due.

Tuesday, March 9, 2010

Tuck Stitch Cowl


Made a cowl using a built-in tuck stitch on my Brother 970 standard gauge machine. It could be made on other machines too, nothing special about that. It's knit flat then seamed. You can see the seam down the middle of the picture. It measures 29" wide x 10" long. Of that 10" there is an inch of 1 x 1 rib on both ends. This was a mill end wool yarn, probably lace weight. Thinner than sport or dk for sure. Then I ran a strand of variegated yarn along with it. The texture is interesting on one side because you can see the zig zags. And on the back side, the variegated yarn showed up much more, as though it were plaited, which it isn't. So, a person could wear either side out.

I'd take a picture of it on my person, but whenever I try to take one in the bathroom mirror, all I get is the flash. Don't know how to turn off the flash on this little Canon Powershot I have in my knitting room. But, it fits and looks nice kind of slouching around my neck. It's surprising how warm a person feels when a person's neck is toasty.

It wouldn't do much good to tell you my stitches and rows, since this is mystery yarn. But you could do a swatch and come up with the 29" x 10". The cast on and bind off look pretty similar. I used the circular cast on in the ribber manual. For the bind off, while still doing 1 x 1 rib, I knit one loose row, as loose as the dial would go. Then I transferred the ribber stitches to the main bed and chained off from right to left. Maybe because the pattern is so busy it helps Camouflage the stitches. Really easy to make, that's for sure.

Friday, March 5, 2010

Haven't made a dent


...in this gray cone of yarn. Two six foot long scarves, triple stranded, hasn't done it. I got the double bed tuck pattern from Diana Sullivan's blog: http://diananatters.blogspot.com/
wishing I had prettier yarn to show it off. I used a tight tension on the standard gauge machine so it didn't come out as lacy as hers. The left side would probably be considered the public side and the right side the back. Doesn't really matter. It's nice and squishy. If you stretch it out a bit, you can see the tuck pattern better.
After a gazillion rows, nice smooth non-rolling edges, no dropped stitches and no mispatterning. That's a very good thing. It will keep someone warm next winter.

Thursday, March 4, 2010

More Ribber Love


By sheer force of will, I have made myself use my ribbers over the last several months. And now, I have to say I do love them. Everyone said it would happen and it did. I'm trying to get rid of excess yarn, so cone by cone it is disappearing with charity scarves. They're great projects---like long swatches to practice different techniques, stitches and patterns---that become useful items.
Here's the latest, a racked scarf:
The yarn is 3 strands of some thin, unknown fiber content. One of those impulse mill end purchases. Nice color and softness, though. On my standard machine, I did a full needle rib cast on (check your manual) then transferred stitches so that I had every other needle on the ribber. (Every other ribber stitch got transferred to the main bed which still has all needles in work.) I did 59 stitches because I have a nifty 60 stitch ribber comb. End needles on the main bed. After the cast on, I set the row counter to 000, T 3/3. Starting with H5 knit 5 rows, racked to H3 and knit 5 rows. Repeated these 10 rows to RC 550 (or so). Knit one row at the loosest tension. Cut main yarn. Then I set the carriages for circular knitting and knit 20 rows with waste yarn. To cast off, I folded back the waste yarn, found the very end stitch on the side opposite the yarn tail. With the latch tool, chained off going back and forth from front to back to front to back. Pulled the yarn tail through the last stitch. When you run in the two yarn tails, you are DONE! No blocking necessary. Lies perfectly flat. Has body, is nice and squishy. I like it.
I've tried racking before and found that it required tons of concentration or I'd get lost as to which direction to go with the racking handle after a while or when interrupted. This was easier in that when the row was 1-5 I was going with H 5 and when the row was 6-10 I was using H3. (Or the other way around, doesn't matter, as long as you are consistent from the get go.)
The scarf ended up to be 9" wide and 60" long. Kind of neutral in that it could be masculine or feminine, methinks. 550 yards x 3 strands....1650 yards? or is it really 550. I think I'll go with 550 since it's "yards knit".

Monday, March 1, 2010

Tuck Baby Blanket on the Brother KX 350 Midgauge Machine


Boy, have I been a lousy blogger. I've been knitting, but not good about getting pictures up here and describing things. So, I thought it was time to breathe a little life back into the ol' blog. This is a baby blanket I've done for charity. A friend gave me this hot pink cotton yarn and it goes nicely as a baby blanket. Our guild gives blankets to Project Linus so I chose to knit it at our guild's knit-in last Saturday. People usually bring their plastic bed machines because they are easy to transport. I used my Brother KX 350, a 7 mm midgauge, which is totally manual.

Here's how I made it if you care to do one yourself. It could be made on any machine using your own measurements and yarn. If you also have a midgauge you could use this needle arrangement. Otherwise, do a little math to make the repeat come out right for your needle bed.
Ewrap 129 stitches and knit 6 rows to make the end plain. Use a lot of weight on your work. Mark the needle bed with a pencil using X's for the red and o's for the orange. (See the diagram below.) What you do is mark O's on the 5th needle slot then every 8th across the bed ending with 4 needle slots on the right side. Now mark X's starting with the 9th needle slot, then every 8th across the bed, ending with 9 slots on the right side.
*Set your machine to hold going both directions. Pull the needles marked with O's all the way out toward you. Those are the stitches that will tuck. Knit 5 rows. Take the carriage setting off hold so that the next row all stitches will knit off. Knit 1 row. Now pull out the needles marked with X's. Change your carriage to hold both directions again. Knit 5 rows. Take the carriage setting off hold so that the next row all stitches will knit off. Knit one row.* Repeat this 12 row repeat, from * to * for the desired length. You kind of get into a rhythm. Tuck spreads out wider than stockinette, but it also takes more rows to get the length. I wanted a square baby blanket, so when I thought it was about the right length, I measured by bringing up the lower right corner to the upper left. Once it made a triangle, I pretty much had a square. (Trick learned from a guild friend.) Then knit 6 rows plain and bind off.

Your repeat would look like this with the sides plain. (Hope that makes sense.)
It makes a honey comb kind of pattern when the tucks are alternating.

The edges decided they wanted to curl, so I found it necessary to do some crocheting around it. I did two rows of single crochet and to make the ruffle did 3 double crochets in each stitch around. Whew! That took longer than it did to make the blanket. I have a new found respect and appreciation for my other machines after doing all that hand pulling of stitches. Turned out nice, though.