Friday, January 22, 2010
Jester Feet!
I made some toasty felted slippers for myself. They turned out well, I thought.
This is where I found the pattern.
http://hurpeknagg.blogspot.com/2008/01/felted-slippers.html
Thank heavens she did a color coded chart or I would never have been able to put them together---must have a spacial orientation problem. The pattern is for hand knitting, but I did them in a flash on the machine. Sewing them up took a little longer. In order to sew the right square to the correct match, I hand sewed yarn markers where the colored dots were and butted up the matching pieces. It was a leap of faith for a while there. I'm amazed when people come up with clever things like this.
I used Lion Brand Wool, two skeins. One black and one purple. It's considered medium worsted, three ounces is 158 yards. I used my midgauge machine and at T 10. was able to get squares with 22 stitches x 30 rows to fit my size 9 feet. If you wanted smaller or larger slippers, since felting is so unpredictable, you'd have to make some guesses. In case you are wondering, I did a random pattern with the two colors and didn't care if the two feet matched.
Since we are still in the throes of winter, these are coming in handy!
Wednesday, January 20, 2010
Heart Skirt and Shrug for American Girl Doll
On a roll! Now have 3 outfits done. Probably have said this before, but it sure is fun to make these little outfits because they go so fast. And, have I said how much I love red??? I'm guessing these two pieces add 200 yards to my running total. It's really hard to calculate, but I think/ hope I'm underestimating rather than overestimating.
I think she needs a Norwegian sweater next...
Monday, January 18, 2010
And Capri Pants to Match
I tried the Knitware pattern for 18" dolls, but somehow it didn't work. So, I borrowed what I could and came up with these this morning. Too lazy to fire up the camera so just stuck it on the scanner. But you can see in the pic that follows that they fit. Here's how I made them:
MACHINE midgauge 6.5mm
YARN worsted (I think more medium than heavy)
GAUGE 4 st x 6 rows = 1" at T 10
FINISHED SIZE Length 8.5", width 6.5" at hips (x 2=13" around after seaming)
KWK means knit, wrap the end stitch, knit back
Increases - move 3 stitches out one needle and pick up the heel of the inside stitch and hang on to the empty needle.
Decreases - move the end stitch in one needle.
Start at the cuff and knit to waistband.
Knit 2:
Cast on over 26 stitches with main yarn. At T 3 knit 4 rows. Change to T 10, knit 4 rows. Hang a hem. RC 000. Increase one stitch both sides, knit one row. Increase one stitch both sides every 3 rows to 40 stitches. Knit to RC 28. Shape crotch. Bind off 4 stitches at the beginning of the next two rows. Decrease 1 stitch both sides, knit two rows 2 x. (26 stitches) First leg, CAL. Second leg, CAR. Short row for the rear end. Set machine to hold. Put 13 needles on the right (left for other leg) on hold. KWK. Put 4 stitches to hold, KWK 2 times. Take machine off hold. Knit to RC 44. On RC 44 run a length of contrasting thread so you can see which stitch to hang later for the hem. Change to T 4 and knit 11 rows. CAL. Hang hem. Knit one row left to right and bind off around the gate pegs with the latch tool. Seam the back from top to crotch. Seam the front top to crotch leaving openings both sides on the front of the waist band for the I cord to slip through. (Make sure the short rowed butt is the back side.) Seam the legs both sides. Remove the marker thread.
Make a 3 stitch I cord at T 3, long enough to go around the waist, tie knots on the ends and tie a bow. (Sorry, I forgot to record how many rows, but you can measure while on the machine.) Hide the ends of the Icord inside the cord. Run the I cord through the waste band. Steam the pants a little if desired.
There always seems to be a "if I were to do these again" sentence.... I'd make them a little shorter (-6rows) and a little tighter (T 9 instead of T10). They're a little loose, but they look ok. One more outfit done for the sil.
Sunday, January 17, 2010
Poncho for the American Girl Doll -- a machine knit pattern
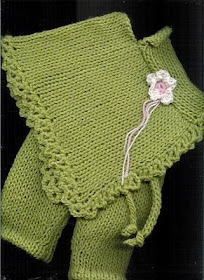
Here's a super easy pattern you might want to consider if you are into knitting for the American Girl doll. I made it on a midgauge machine, but if you use your own gauge and a different machine you can make an identical one. See the note at the end of the pattern.
Yarn: Acrylic worsted, 2 ounces main color; a few yards of finer yarn, two colors for corsage
Finished size: 8" x 8" measured diagonally from shoulder to bottom edge
Gauge: Tension 10, 4 st x 5 r = 1"
Directions
Knit two rectangles. Cast on 34 stitches and knit 36 rows. Bind off loosely. Sew the short end of one rectangle to the end of the long rectangle. Repeat for other side. When seaming, leave enough of a neckline to go over the doll's head. It will be snug. Hide yarn ends.Crochet an edge with size E crochet hook. *DC into the garment at the edge. Chain 3, DC into the same stitch as first DC. Skip one garment stitch.* Repeat from * to * around. Hide yarn ends. Mine came out really ruffly and the edge wouldn't lie flat so I steamed it pretty vigorously. Is lots cuter than it looks in the picture.
Crochet a corsage. Chain 6 and connect to first chain to make a circle. SC into circle 10x. Fasten off first color. Leave a 3" yarn tail. Change color. SC, DC, SC in the same stitch on the outside of the circle. Skip one stitch and repeat around to create 5 petals. Fasten off leaving a 3" yarn tail. Let the yarn ends dangle. Sew the corsage to the poncho.
To make on a different gauge machine, use your gauge to make the rectangles 9" wide x 5" long. Multiply 9 x your stitch gauge per inch and 5 x your row gauge per inch.
I'm thinking some apple green capri pants would be cute since I have yarn left over. I think Knitware has some doll garments. Will check it out. Stay tuned.
Afterthought: If you're finding the neck too tight, try again by adding 5 or more stitches to the width and this should make it easier to slip over the doll's head.
Saturday, January 16, 2010
Knitmeter
The bulk of what I've knit this month I haven't put up on the blog because the items are for the summer issue of Knitwords, so you'll have to take my word for it.
One mile = 1,609.34 meters
So, that's another thought provoking thing. I have knit slightly over a mile in 1/2 month.
I'm thinking of knitting Diana Sullivan's round baby blanket as a felted "foot-upon". (As opposed to the famous "sit-upon"s that hunters and people in really cold climates use.) That ought to use up a few meters. Where my husband sits at his computer, the wall and floor are really cold. We had extra insulation put in last summer, but evidently not enough. So, I thought this felted thing could go between the wall and his feet. Good way to use up scraps of wool yarn.
Geewillikers. Knitting machines are cool. It would take a lonnnnnnnnnng time for a hand knitter to get as far as I have in less than a month.
Friday, January 15, 2010
First Machine Knit Charity Hat of 2010
This is a copyrighted pattern, so I can't share it with you, but you can probably figure out how to do it. Wondering if anyone else has done a doubled ski hat. The top seems fine, and I like that the floats are enclosed, but when you get to the rolled up cuff you have 4 layers. I guess for snow sports in climates like MN this is ok. Just seems so bulky to me. The yarn is some mystery stuff I had in my stash. Hopefully some 10-12 year old outdoorsy guy will be able to use it. The pattern is one that is built into my Brother 970. I like it. A few of the gals in my knit guild have made a new year's goal/resolution to make a charity item for every personal item they knit this year. Good idea. I'm going to try to do the same.
The brim is done in 1 x 1 rib. With black, knitting at night, I really couldn't see the stitches and kind of took a leap of faith. When I got it off the machine I saw that one of my needles was tucking every other row!!!!!!! #53 right, to be precise. O maddening. Since I have run out of main bed needles, I'll swap out an end needle with ol' #53. Good to find the bad boy anyway.
Tuesday, January 12, 2010
American Girl Doll Scarf Pattern
What's nice about retirement is that you can waste time with a minimal amount of guilt. Usually.
I thought the little red coat needed a little red scarf. I machine knit it, but if you have the time and patience, you could hand knit it easily. So, here it is:
Machine: Standard gauge 4.5 mm with ribber
Yarn: Mary Lou's Solo - or similar wt
Gauge: T 5 13 st and 7.5 rows =1"
Finished size: without pom pom's,
1 1/4" wide x 16" long
Ewrap cast on for 2 x 2 rib. Have one stitch both sides on the main bed and 2 x 2 arrangement for the rest. Knit one row T 0/0. Hang 7 wires and med wt. (The knitting is too skinny to add a ribber cast on comb.). Change to T 5/5 and knit 120 rows. Transfer st to main bed and cast off. With the yarn tails fold the ends in half and tack down. Make 2 small pom poms and sew onto the ends.
If knitting by hand, I'd guess you'd use a size 3 needle, cast on and knit 2 x 2 rib for 16", bind off. Make and attach the pom pom the same.
In different proportions, this would make a nice scarf for a little girl. I like the fact that the edges don't roll. Yea, ribber! I'm liking you more every day.
Monday, January 11, 2010
Oops
Sunday, January 10, 2010
American Girl Doll's Little Red Coat
So, this is how I occupied my time today. My sister-in-law asked me to make some clothes for her significant other's grand daughter's new doll. I used Charlene Schafer's "Complete Wardrobe for American Girl Dolls". There are some cute items in it. I have to say, though, that Charlene could use a proof reader. The book contains some funny little typos, like the instruction to make 3 button holes and sew on 4 buttons. Not so funny, giving two different tensions for the same operation. She has you making a full needle rib hems, which inevitably flip up. Much fiddling with less than good results, in my opinion. I thought it would be better to do a hung hem, just stockinette. If you did the outside at a slightly larger tension or with one more row than the inside of the hem, it would look good. The sleeves aren't supposed to flare out in the pattern, but changing from fnr to 2 x 2 rib makes them look ruffled. Cute, but I don't think the picture of the completed coat looks the same. I'll have to double check that.
What I do like is the bodice. Red is hard to photograph, but changing to 2 x 2 rib makes it pull in for a more fitted look. A little beret matches the coat, which I haven't knit yet. Well, I hope she likes it. Here are some more views:
Maybe I'll make her a 2 x 2 ribbed scarf. That would be easy enough to do.
Sunday, January 3, 2010
Puppy Paw Preservers
PPP'ers (Puppy Paw Preservers)
By Mar Heck ©2010
Never thought I'd find myself doing such an odd thing, but here they are. Our Keeshond, our third child, loves the cold weather. The colder, the better. We've been experiencing 17-20 degrees below zero Fahrenheit this winter. Never mind the wind chill. She runs outside, does her biz, rolls in the snow a bunch of times, then spreads herself full length on the iciest spot she can find. She doesn't know when to quit and her paws are suffering. So--------I thought I'd make her some pittens (mittens for her paws) or PPP'ers (can't decide which name I like better) and learn some more about my Silver Reed 860 midgauge at the same time. I started with the cuff, made some eyelets so I could have a drawstring to keep them on her legs, then knit the mitten part circular, decreasing for the tip.
This is Gertie---the cold loving Keeshond. I guess with all that fur, you can see why she doesn't mind our Arctic weather. The pads of her paws are another story, however. Here's the pattern.
Machine: Silver Reed 860 midgauge with ribber
Yarn: Mary Lou's Schuss Plus, 100% wool, a light worsted weight about 150 grams
Gauge: At T 6/6 for mitt, 6 st and7 rows to one inch
Finished size: 6.5" long and 3.5 inches wide including ribbing. Gertie is a 40 lb mid sized dog. (Not as big as she looks under all that fur.) You may need to adjust up or down for your pooch.
Directions:
Cuff---ewrap cast on for 1 x 1 rib (or use your manual's cast on) and knit 16 rows of ribbing at T 3/3 over Left 21-Right 20 on main bed. Transfer rib stitches to main bed, knit 2 rows with regular carriage. Transfer every other stitch to neighboring needle to make eyelets. Keep emptied needles in work, knit 2 rows. Put half the stitches on hold, machine to hold, take other half off on waste yarn. Change to T 6/6. Don't cut yarn.
Mitt---Set your machine to knit circularly. (Consult your manual.) Carriage will be on the right. Do a free pass to get it to the left where the yarn end will end up. Fold the cuff so that you can hang the half on waste yarn onto the ribber. RC 000, Knit 33 rows. Decrease one stitch each side, both beds with a 2 prong tool. (Move one stitch over, keeping the edge stitch the same.) Decrease down to 8 stitches on main bed. Cut main yarn with a 10" tail for seaming. Keeping the circular settings, knit 18 rows waste yarn. Remove from machine and kitchener stitch the toe stitches shut. Hide yarn end. Seam the side of the cuff with a mattress stitch.
I Cord--- Cast on 3 stitches with contrasting yarn (just for fun), set machine to knit one way and slip the other. Knit 260 rows. Bind off. Tie a knot in one end and weave it in and out of the eyelet rows. Tie a knot in the other end and make a nice bow. Your dog will be grateful, just as the gorgeous Gert is.